By Paul Ziino
After a long day’s work of editing logs, adjusting rotations, building clocks, and analyzing your data, it’s always a good idea to make a backup. Here’s how…
Go to Tools/Backup. Here you can “Perform a Standard Backup” which simply creates a zip file of your database, and leaves it in the same directory where you store that database (the MMD file).
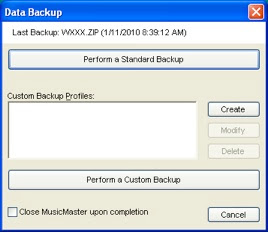
You can also create custom backups. These would allow you to backup to a different location—maybe to your network or to a USB thumb drive. They also allow you to include additional files and definition files. It’s a good idea to make a custom backup at the end of every day and to label the backup accordingly. So when you have finished your MusicMaster work on Monday, create a Monday backup. Here’s how…
Again, go to Tools/Backup. This time click the Create button. There are several options available here.
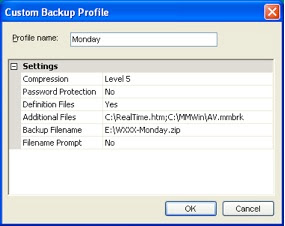
• Profile Name: Call this custom profile anything you’d like.
• Compression: Determines how the data will be compressed, the larger the number the smaller the backup file will be.
• Password Protection: Determines if you’ll be prompted for a password prior to backup and restore.
• Definition Files: When set to “yes” your definition files will be included in the backup. These are necessary for reconciliation, traffic merge, library synchronization, and web exports. It’s a good idea to set this to “yes”.
• Additional Files: Here you can list any other files you wish to include. If that file is in a directory that differs from where your data is stored, you’ll need to include the path as well. Multiple files can be separated by a pipe “|” or semicolon “;”.
• Backup Filename – Allows you to indicate the directory of where you’d the backup to be stored as well as the name of that backup.
• Filename Prompt: When set to “yes” you will be prompted with the location and name you’ve selected. If ok, click SAVE. If not, you can change as needed.
In the above example, we’ve named this our Monday backup, we’re including Definition files and two additional files, and we’re saving this backup to our E drive and calling it WXXX-Monday.zip. When your settings are complete, click OK. Your new custom backup profile will be listed in the data backup window. It’d be a good idea to make a unique profile for each day of the week with the same settings.
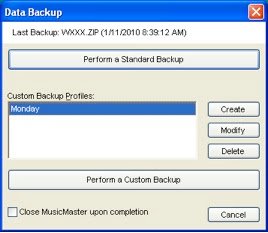
Now you can highlight the Custom Backup Profile of your choosing, then click “Perform a Custom Backup” to execute the process.
Performing consistent backups is an ideal way to safeguard all your hours of work and will allow you to rest easy in the event of computer failure, data corruption, or worse.
Monday, January 25, 2010
Wednesday, January 20, 2010
Getting your Conversion on the Air
By Aaron Taylor
We have welcomed many new users to MusicMaster in the last year. For many of you, that meant having your data converted from other scheduling software. Your converted data was returned to you set up, and ready for you to schedule and export a log to your automation system.
The adventure begins with learning a new program, and then figuring out how to maximize it to make your station sound great. As we continue to constantly welcome new users to MusicMaster, and have many who are currently in the process of switching, I thought I’d offer up some tips that will (hopefully) smooth your transition.
Make sure to sign up on our website, (www.mmwin.com) for a support username/password so you can access the training videos and webinars. Our training videos are very short, and designed to cover just one topic at a time. You can learn how to add a song to a category, move it to a new category, schedule a log and change a position in the log in just a few minutes. There are over 100 training videos that cover the entire program. This means you can continue to come back as you need to learn about new areas of the program, and view them whenever your time allows. Our webinars are longer-form discussions about many topics within the software. With each, different databases that cover various formats are utilized. You should see a format you’re familiar with, so you can concentrate on the steps and processes, rather than the specific songs in the database. View as many as you wish, as often as you like!
Start playing with the Sample database that comes with every MusicMaster installation in advance of receiving the converted database. Consider this your “sandbox” database until you get your conversion. You can do anything you want to this database. You might decide to watch some of the videos, and then practice those functions in this database.
Talk to your Music Scheduling Consultant (MSC) about setting up a personal training session. All of the MSCs at MusicMaster have the ability to launch a video seminar. The best part is that these are interactive. That means we can have you at the controls, and teach you in the best way possible: while you’re controlling the program.
Be sure to discuss any specific concerns or questions you have about your special scheduling or format goals, as well as any “core” functionality that you might be used to using in another scheduling program and consider “critical” so that we can help identify parallel functionality in MusicMaster.
Once you get your converted data, make sure you make daily backups. I can’t emphasize this one enough. In fact, any time you make significant changes in your data, we recommend you back it up! You have the option of making a standard or custom backup (in the program, select TOOLS-BACK UP.) A standard backup will create a zipped up copy of your data in the same directory the files for the program are located. Your other more flexible option is to create a custom backup profile (or profiles!) These are great if you want to backup your data to a different drive (think USB flash drive,) or put your data on your local network for safekeeping. You can create backup profiles for multiple locations, or even one for each day of the week if you like. If you have any questions on this process and the setup of your profiles, don’t hesitate to discuss them with your Music Scheduling Consultant. The reassurance you’ll get from knowing you can simply restore a backup if something goes wrong, is priceless.
Get your hands dirty. Now that you have your database backed up, dig in, play around, make some changes, and see what happens. If you don’t like the results, remember you can restore the backup. As you become more skilled with the software, have your MSC show you how to clone your database. Then you can continue using one database on the air, while you manipulate a copy to see what kind of results you get. It’s so much better to know what will happen, than to just wonder.
Ask for help. It seems like an easy thing, but we want you to know we’re there for you. That’s why you have a specific rep. That MSC will get to know you, your station(s) and what you are trying to accomplish. As you start to review your converted database, look over the library, including all your usual fields of data, carefully look over your clocks and the rules that are in place. Consider exporting a test schedule to your automation system, and generating a printed music log as soon as you can, if something doesn’t work or look correct, or the way you want...drop us a call or e-mail, so we can help to make the music scheduling process the easiest part of your day! While we certainly hope you have a personal MSC, if you don’t, you can still get help by e-mailing us at support@mmwin.com
Friday, January 15, 2010
Now Holding Auditions For MusicMaster Idol!
There are a lot of nice kids out there trying to make it and they don't all have to go through Simon Cowell. Maybe we all need a little tough love to buff out those rough spots, but there's still something great about hearing raw talent in its infancy. So why not hold our own Idol showcase? We've got a couple contestants in mind, but we want your input too. Maybe you've found some talent by accident on YouTube while searching for covers for your favorite song. Maybe you know a guy who knows a guy that's trying to move past bar gigs. Maybe you're the proud parent of a gifted musician. Maybe you yourself are a rock god on the weekends and have a demo tape that's gathering dust. We want to hear what you've got!
To start us off, I'm calling Jarell Perry into the judging room. Jarell is a fledgling R&B singer/songwriter who first got my attention with an a capella cover of Coldplay on YouTube. He recently released a mixtape which is available for free download. Jarell is gaining attention with the help of indie producers and a dedicated following of fans in his hometown of Los Angeles. Take a listen to any of the album tracks at the website below. I'd recommend "My Life" "Universal Love" and "Indestructable."
It may not be the most polished record in the world, but in the words of the immortal Randy Jackson, this dog's got some pipes.
We invite you to check him out and play Simon or Paula (ahem, I mean Doogie Howser...?). Leave your comments and don't forget to send us your own acts. You can leave links and info in the comment section of this entry, or email audio, links or YouTube to musicmasteridol@yahoo.com.
DOWNLOAD OR LISTEN TO THE ALBUM HERE
OFFICIAL WEBSITE
Sunday, January 10, 2010
Database Security and User Rights
By Drew Bennett
In the mid ‘90s, I took a big job in a large market as the program director of the new Modern Rock format that my station owner had just launched. Everyone was really excited about the new station, from the staff to the community. It’s always exciting when a city gets a new station…it is for me, anyway. My owner had stocked the staff well with an OM, PD and MD. I scheduled the music. Often, though, when I would come in to work, it seemed like my database had changed in profound ways. Days had been partially scheduled and not unscheduled. Songs had moved to other categories. “Hmmm. I don’t remember doing any of this.” It turns out, my MD was fussing with the data, scheduling music and moving songs around. He was excited about the new station, excited about his job and curious about how the logs were generated…and he knew enough about the software to be dangerous. It was catastrophic to the database because I couldn’t identify every change. How can I have control of the data and set it up to be scheduled effectively, when I’ve got other staff members making unsupervised changes? First, the MD and I had a talk and immediately after that, I began getting serious about database security. Here’s how to set it up in MusicMaster:
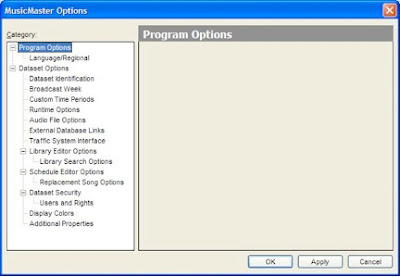
First, find Tools in the main menu at the top of the software. When the Tools menu appears, choose Options. You will see this screen appear:
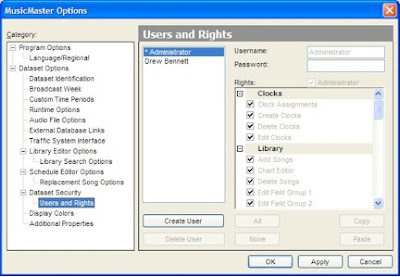
Find Database Security at the bottom of the list and highlight Users and Rights just below it. Your screen should look like this:
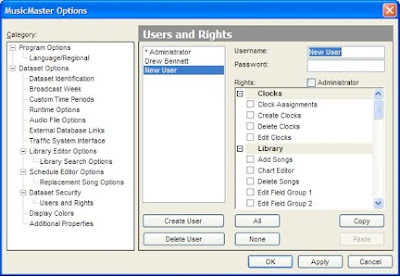
Here is where you set up usernames, passwords and permissions for each user who will be accessing the data. The great thing about this section is that you can allow and disallow users from accessing specific areas of the software or from performing specific tasks. To create a user, choose Create User on the bottom left side of the User and Rights screen.
Type the username for this profile and give it a password as well. Finally, put checkmarks next to the sections of the software that this user will be able to access and use. You may choose to put a checkmark next to Administrator under the Password field. This sets the profile as an administrator, giving full access to every part of the software. Once you’ve made your choices, choose Apply.
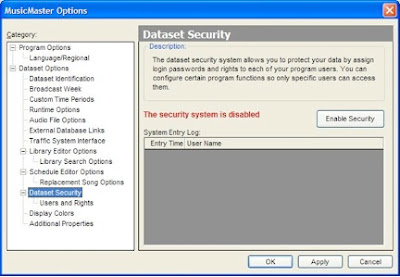
Now, on the left side of this screen, choose Data Security from the main menu. Your screen should look like this:
Simply choose the Enable Security button to activate your security profiles. Now, when you close MusicMaster and reopen you will be required to enter your username and password before you can access the database. Database security can be a top priority if two or more users will be accessing and making changes. Make sure your users only have access to the area of the software they have been authorized to use.
Wednesday, January 6, 2010
Setting up reconciliation in MusicMaster with your automation system
By Aaron Taylor
You likely already have (or had used in the past) some method to keep track of what songs were actually aired on your station that weren’t initially accounted for when you scheduled the music logs.
For most people, this involved asking your air staff to mark or note the printed music log for their shift with the songs that they didn’t have time to play, added to an hour, or perhaps moved to a different place in the hour or their shift. Then, it was likely up to the Music Director (or an assistant) to take all these various paper logs after a time and reconcile the additions, changes, and deletions that the air staff made to their shifts by hand back into the scheduling software. This was oftentimes a very tedious process, but a necessary one in advance of generating the next run of schedules. That way, an accurate accounting of what actually aired was used, and any songs that were added “by request” were accounted for in rotations, or those not aired were available for consideration again for the next scheduling run. Of course, a downside to this method was that it left the accurate and honest “accounting” of what was added, deleted or moved up in the shift to the person on the air.
MusicMaster for Windows makes it SO EASY to run this process whenever you wish. The program runs an easy to understand report each time you execute this process to review what exactly was added, deleted, or changed in the schedule dates you choose to reconcile.
It is likely that your automation system is already generating what we’ll call an “as run” report on a daily basis. You’ll want to consult the documentation on your system, the technical support department for your hardware, (or your MusicMaster Scheduling consultant) to help you identify where these files are being generated and their filename format. We’ll use these daily ACTUAL aired logs from your play out system to compare what was scheduled in the MusicMaster database log for the date(s) in question.
Once located, we’ll request that you send us a sample or two of some past dates, along with a backup of your MusicMaster database. Additionally, (if you know it) we’ll request that you tell us the “path” on your network or machine that MusicMaster will look to each time you decide to reconcile a day. We can help you locate this path as well if needed (as part of a call/GoToMeeting session with your Music Scheduling Consultant.)
Chances are, we’ve seen an “as run” file before from the vendor of your automation system, and we’ll be able to quickly configure what we call a Reconciliation Definition file (we call them “defs” for short) that will work perfectly with your individual MusicMaster database. Shortly thereafter, you’ll receive a “turnkey” .def file from us that is ready to plug into your MusicMaster directory and reconcile some dates!
It is important to make certain you’ve made a verifiable database backup in advance of testing out the reconciliation process for the first time (let your MSC know right away if you are not clear on this step!) That way, once the process is run and you have a chance to put a keen eye to the report that is generated for your test date, if you notice any discrepancies or items you have questions about, you can “put things back to the way that they were” (before you ran reconciliation) and we can work together and discuss the issues that come up, or make any additional tweaks that may be needed to your database or the provided definition file.
To access your reconciliation definition file inside your MusicMaster database, Go to DATASET-SCHEDULER-RECONCILE. From the window that appears, select the date you want to reconcile. The first time you run this, we would suggest you select just a one day time period, so you can be certain the process has run correctly.
A few notes on the process and the report that is generated. MusicMaster will only match to items that exist in both the automation system file and your MMWIN database (typically automation file numbers are used for a match) so it will not add anything to your MusicMaster database that wasn’t already there as part of the reconciliation process. Additionally, it will not be able to account for any information that is part of your MusicMaster database via log notes. It is a good idea to wait until the end of the current broadcast day to reconcile that days “as run” file. Here is a small sample of what you might see:
In this example, a song is added and one is removed from the midnight hour. The 1AM hour had no changes. Again, your MusicMaster consultant will be able to help you interpret what you are seeing in the report that is generated, as well as assist you in addressing any special circumstances that may require either changes in your database or in the definition file for your specific circumstances. You can save the report using the icon on the toolbar if you wish to review it at a later time.
Once set up, you’ll have an accurate way to know what has and hasn’t played. That means any report you run, whether for yourself or for some governmental agency, will be an accurate reflection of what really happened on your station.
Friday, January 1, 2010
Rules That Play Together Stay Together
By: Joe Knapp
One of the least-used and probably the least-understood property of the Rule Groups in MusicMaster is called Group Mode. The default setting is "Rule group fails when any included rule fails." This simply means that when MusicMaster encounters a rule failure within this group, it moves on immediately. It doesn't waste time testing the rest of the rules in the group. A failure of any rule within the group makes the entire group act like a failed rule.
If you change the Group Mode to "Rule group fails when all included rules fail," something really interesting happens. MusicMaster now moves on when it encounters a rule that passes. The Rule Group only "fails" if EVERY rule in the group fails. How might one use this setting? We'll show you one really cool way to use this right now!
We're going to create a Rule Group that has several acceptable Shift Rotation Pattern rules in it. If ANY of these patterns are followed, everything is groovy. But, if MusicMaster is not able to match ANY of the patterns, we need to dig deeper until we find a song that works.
The Shift Pattern Rotation rule lets you create acceptable movement through the different parts of the day, which we call Shifts in MusicMaster. This station has seven Shifts, so we're saying here that movement from Shift 1, to 3, to 5, to 7, to 2, to 4, to 6, is fine. Any other pattern of moving a song through the dayparts would be unacceptable -- if this was the only such rule we establish.
Here we've created an alternate pattern, now allowing songs to move from Shift 1 to 4, then 7, then 3, then 6, then 2, then 5 (then back to 1 again). If we tried to apply BOTH of these rules, MusicMaster would be pretty confused. It would try to find songs that follow the first pattern, only to find that they don't follow the second, and vice-versa. But, if we put both of these patterns into a Rule Group and set the Group Mode to "Rule group fails when all included rules fail," MusicMaster will now allow songs to follow either rotation pattern! If the song last played in Shift 1, it can now play in Shifts 3 or 4. If it last played in Shift 2, it can now play in Shift 4 or 5. Do you see why this works? Pick any Shift number and look for it in both patterns, then look at the Shift number that's right next to it.
If you added more acceptable Shift Pattern Rotation rules to the group, you could expand this even farther. MusicMaster would love you for that, since every one you add makes it that much easier to find songs that "work" in any given Shift.
Here's what our Rule Group looks like in the Rule Tree with the two alternate patterns allowed.
See if you can think of any more interesting ways to use this Group Mode. If you come up with any, please let us know!
Subscribe to:
Posts (Atom)