Monday, August 29, 2011

MusicMaster/iTunes Integration

By Aaron Taylor

Want to add your song data from iTunes straight into MusicMaster? How about creating playlists that can then be played out via iTunes? There’s got to be a way, right? In this article, we’ll lay out the steps to do just that.

First off, you’ll want to get in touch with your MusicMaster Scheduling Consultant to discuss your needs and plans. They will assist you in reviewing your database(s) to identify whether additional fields will be needed to allow the integration to work. Your MSC will also provide you with the needed files to add to your database, and your Music Master directory.

Synchronizing your iTunes music library with MusicMaster

Your MusicMaster Scheduling Consultant will need to forward you our library synchronization.def for iTunes (we’ve already done most of the set up work on this for you). We’ll likely need to schedule a call/GTM session with you to direct on configuring where the library file from iTunes will be sent, and where the field data from that program will be imported into MusicMaster. That shouldn’t take more than five or ten minutes.

Once this is customized to your database, then you are ready to go into iTunes and export your library to MMWIN. In iTunes, you will want to go to FILE-LIBRARY-EXPORT LIBRARY.

The library.XML will then appear in the directory you designate in the export path in iTunes. Once that step is completed, you’ll then go to your MusicMaster database and run the library synchronization def.

When you run the synchronization, you will find the songs you imported from the iTunes library in the NEW category list (this category will be created for you automatically if it does not already exist). From here, you’ll likely add the songs to their proper categories and get ready to schedule a playlist for export.

Exporting a scheduled playlist to iTunes for play out

Your Music Scheduling Consultant will also need to forward you our export XML template for iTunes, (again, we’ve done most of the work here already), and we’ll just need to align the fields in the template design to the available fields in your database. If you’ve had prior experience adding in a “template” design we’ve provided to you in the past, this is the same procedure. Of course, we are happy to assist in this process! This is done via the MMExportDesignEditor.exe found in your c:\mmwin directory.

Next, we’ll assume here that you’ve already scheduled and edited a playlist; you wish to export to iTunes.

Now, you’ll want to go ahead and export the playlist you’ve created to a place that your iTunes can find it. Export the playlist the same way you export currently…DATASET-SCHEDULE-EXPORT-EXPORT TO AUTOMATION. Select your iTunes export this time, and you probably should double check the Export Path and Export Filename boxes at this time as well.

Once the file has been exported, go to your iTunes application and import the playlist.

And play when ready!

If you’d like more information on the set up of this functionality, or further assistance, please contact your Music Scheduling Consultant for assistance.

Friday, July 29, 2011

Emergency Preparedness

By Marianne Burkett

In the light of the unusually severe weather we’ve experienced this summer, I thought it a good time to discuss being prepared to “cut and run” with your stations database, your dongle and a copy of the MusicMaster software application safely tucked away.

This isn’t just about flooding, snow emergencies, hurricanes, tornados, fires and earthquakes. It can also encompass something as simple as a rolling brownout, sudden power outages, hard-drive meltdown, illness or worse!

A Short, Mostly True Story:

The rain was relentless and the rivers were spilling over their banks. Homes were being engulfed in water all through the city. The radio station, seemingly impervious to other bad weather situations in the past, was locked up for the weekend. The staff headed home to save their properties and help those in trouble. Then, the unthinkable happened. The river crested on Sunday and completely flooded the radio station. Every desk, every computer, every laptop, the studios – EVERYTHING destroyed in the blink of an eye.

On Monday I received a call from the Program Director. He explained what had happened. I asked the simple question: Do you have a backup with you? He did not have a backup, it was at the station. He did however have an old laptop at his home, with an old backup stored on it. It was a very old backup… five years old! I explained what type of things would need to be done in MusicMaster, including Library Synchronization and rebuilding Categories, Clocks and Coding and… I worked with him on the project. The Program Director also re-named old export files to recent dates, so something was on the air until his work was completed on the database. The station was re-built and life is back to normal in the River City.

I certainly don’t mean to alarm you, but I would suggest doing a “Standard” backup to your hard drive, or server on a daily basis, in addition to performing a “Custom” flash drive backup on a daily basis. Along with backing up the database – save a copy of the MusicMaster software application on a flash drive. This way, in the event of an emergency, you can run the software and restore your backup onto your home computer or laptop and still generate logs.

Performing backups:

Tools/Backup/Perform a Standard Backup. The backup file will be created and be stored to whatever location your MusicMaster icon is pointed to. To find that, right click on your MusicMaster icon, go to Properties and look at the path. In the example below you’ll see my icon is pointed to N:\MMdata


Performing a Custom Backup
It’s as simple as performing a Standard Backup! You’ll need to create the backup profile before you can perform the Custom Backup. First, you’ll need to find out what letter your flash drive is. Plug in your flash drive, go to “My Computer” or “Computer” and take a look at what drive letter is assigned to the flash drive. In the example below, my flash drive letter happens to be “E”. Then, go to Tools/Backup “Create.”


Under Additional Files, consider adding in any files you need for reconciliation or traffic processes (the .DEF files). These will then be included in your backup for safekeeping.

Click OK and you’ll be all set to perform a Custom Backup every single day.

You can create multiple Custom backup profiles as well.


Another safety net is to email yourself a backup on a daily basis. Cyber-space is a wonderful thing.

I’ve also discovered the joys of using a new free service called Dropbox, to store my backup in “the cloud”.

You may think I’m a bit paranoid in doing all these backups every single day I do work in MusicMaster. So what? I’d rather be a bit paranoid and careful, than lose even one day of work to some kind of natural or unnatural disaster.

Another thing of not is that you can access all versions of the MusicMaster software application from our support center.

Of course, if you have any questions at all – feel free to contact your Music Scheduling Consultant. We are always here to help.

Friday, July 1, 2011

Alternate Categories


By Paul Ziino

Once set up, Alternate Categories within MusicMaster can offer a lot of options to music programmers.  The basic concept is that in some dayparts you want a song to rotate in one category, but in other dayparts it should rotate in a different category.  However you want MusicMaster to count plays in both categories for that song’s play history.

Step One: Cloning songs

In order to copy a song from A and add it to B, find the song in category A, right-click on it, then select Copy/Selected Song then select the category to copy it to (B).


Step Two: Sharing History

You’ll need a Keyword Single field in which to place a unique identifier for the song—typically its automation number.  If your data is lacking an unused Keyword Single field, contact your MusicMaster Scheduling Consultant and ask them to add one for you.  You can label this field as “History Link”.  Make sure to note the field ID assigned to the History Link field in Dataset/Library/Fields.


Now go to Tools/Options/Additional Properties.  Under the History Header, indicate the History Link field ID in the Primary Rest Field, and set Primary Rest Rules to 1.  This tells MM to use the History Link field when determining song rest.  Then click Apply and OK.


Step Three: Adding the History Link and Dayparting the songs

Now that you’ve copied the song into its alternate category and set up the Primary Rest Field and Rules, you’ll need to add the History Link to the two copies of the song.  This should be the same on all copies that you wish to share a history.  As stated earlier, this is commonly the Automation ID for that song. 

Once the link is in place on all copies, it’s time to set the Dayparting restrictions on them.  For this example, we want the copy in A to play from 6am-6:59pm and the B copy to play from 7pm-5:59am, seven days a week.  Double-click in the Dayparting field for the first song and create the restriction.  Then repeat the process for each additional song.

Restriction for song in A


 Restriction for song in B


You are now ready to schedule your logs.

Step four: viewing combined histories

After you have scheduled music, open the F6 history graph for one of your linked songs.  By default MusicMaster displays all scheduled spins of that song within the active history.  But you can use the dropdown at the right of the song line to switch from the Song view to any keyword history, packet history, and even move history.  And since the History Link is a keyword field, you can see a combined history of all songs sharing that History Link!  Furthermore, you can click the icon to “Highlight plays by the active song” to add boxes to the display for spins of this copy as opposed to other copies of the song.

History graph of song in A


How long should I keep the copy?

That really depends on your situation.  Remember, if you delete a song from MusicMaster, its history will disappear.  So we would suggest that if you no longer wish to play the copy that you remove the Automation code from it and then put the song into an unscheduled rest category, while leaving the History Link in place.

Why Use Alternate Categories or History Links?
There are a couple reasons you might use Alternate Categories or History Linking in MusicMaster.  One reason—you schedule a song in Heavy during the day, but at night you want it to schedule in Light.  A second reason—you have a special show that uses its own music categories, and you want this song to appear in both regular rotation and the special show’s rotation as well.  A third reason—you have 2 or more versions of the same song, and you want MusicMaster to treat them equally, so you’d add the same history link to each version.  And you may come up with more reasons, too.

Wednesday, June 1, 2011

Virtual Shows

By Marianne Burkett

What is a “Virtual Show?”  Here we’ll define it and give you some examples of how you might use it!

Definition:

Virtual Shows are automatically assembled when you export logs to your Automation System. A Virtual Show is a single song card that contains a list of Song IDs in a field that you specify in Tools, Options. When the main song card is exported, it is replaced by the list of songs that are specified in that field.   The field MUST be an available “Keyword Multiple” field.

Step One:

Open your Database Field Editor (Database/Library/Fields) and scan the list for an unused Keyword Multiple field and rename it to your liking.  In the example below you’ll see I named my field “Virtual Show.”  It is field number 138.


Click Ok.

Then go to Tools/Options/Additional Properties and scroll down to the bottom of the Scheduling Section and fill out the field number of your Virtual Show field.  Click Apply and Ok.


Now the field is activated for the Virtual Show export feature!

Step Two:

Pull the newly named field for Virtual Show and your Song ID field into your view in Library Maintenance using the Show/Hide Fields icon:


You may want to save this view as a “new” view, adding it to your list of existing views.
Now, the reason I list both the Virtual Show field and the Song ID field is because we are going to be using the Song ID numbers IN the Virtual Show field.

Step Three:

Decide which events you want to travel together in your export, and in what order you want them to play.  In the example below I’ve decided that whenever Katy Perry’s “Thinking of You” is scheduled, I’m going to attach a specific Katy Perry Artist Liner to that song card, with the Liner event playing first.


Her Song ID is “918,” the Liner Song ID is “966.”  I add them to the field in the order I want them to play in automation.


Now run the scheduler.


In the Editor you’ll see Katy Perry’s song “Thinking Of You”…but you don’t see the attached liner.

However, when you export to automation the attached event is visible at 7:22am.


Of course, this example of just attaching a Specific Liner to a song is just a teaching mechanism.
Another example of a great use of the Virtual Show Feature would be if you wanted to play a series of titles in a specific order, like to play out a full classical composition with single song card, but then automatically export the individual movements without actually having to schedule those individual movements.

Keep in mind the Schedule Editor is the basis for individual song histories, so if the individual songs are not listed in the editor – they will not be counted in history reports, like BMI/ASCAP or Sound Exchange.

With automation and MusicMaster’s Automatic Reconciliation you can reconcile those missing histories back into the editor.

For more information on Virtual Shows, we have a short Training Video on the MusicMaster Website at http://www.mmwin.com/support/videos.php under the Library section.

Saturday, April 30, 2011

Using Rule Groups to “Ignore” Weekday vs Weekend Plays

By Marianne Burkett

This is quite simple to set up, so if you follow this step by step you’ll be done in no time!

Open your Rule Tree and go to the very first folder in Available Rule Types on the right hand side of the rule tree, called “Special Rule Tree Items”.  Inside that folder you’ll see Rule Groups.

First drag two rule groups into either the Breakable or Unbreakable folder of the first category you’d like to work on.  Identify one Rule Group as your weekday rule group and the second as your weekend rule group.  Once you’ve created a Time restriction for each rule group…be sure to select from the drag down menu immediately below your Time Restriction window “Ignore plays outside this time period”.

See illustrations below:


Once you have these first two Rule Groups set up, don’t populate them yet! Copy and paste the empty rule groups into the other categories you’d like the “Ignore weekday or weekend rotation rules” to adhere to.  Once you’ve done that, populate your rule groups with rotation rules that make sense for each category.

In the close up below you’ll see a Minimum Rest rule and Exclusive Day Offset rule that are “outside” the rule group and will be adhered to 24/7.  Inside the rule groups you’ll see some “dayparted” or “time restricted” Rotation Rules.


Also, in the example below, the Sliding Day Offset rules are different since we’re dealing with a larger window for the weekday rule group and a small window for the weekend rule group.


Remember, each category rotates differently, so be sure to utilize the power of the MusicMaster Turnover analysis icon, which on the illustration above is the blue arrow icon next to the calendar icon.  The turnover analysis will give you a good idea about what kind of rules you need, such as day offsets or play offsets.  The day offsets test from day-to-day, and are often used with small categories where a song would play every day or several times a day.   In the next illustration you’ll see The Recurrent category will play almost everyday:


Play Offset Windows are used on categories that turn over at a much slower pace, like the sample below:


For more information about how to set up Rule Groups and the correct rules for your library, contact your Music Scheduling Consultant!

Using MusicMaster with Dropbox

By Drew Bennett

Today, I’m going to share an inter-office secret. I’m going to tell you how we share files between one another. Now this is top secret information so don’t go telling everybody. It might get back to your competition and they might become productive of all of a sudden.


That’s right, we use Dropbox to share files with one another. In fact, I used it to deliver this article to the person who is in charge of posting the blogs we write. Now, THAT is some super secret MusicMaster information I’ll bet you didn’t know. Today, I’m going to show you how to use Dropbox with MusicMaster at the station to make your life easier (and maybe your consultant’s life easier as well.)

First, I’m going to cover how to set up a Dropbox account and then I’m going to discuss some tips that might send your productivity through the roof.

Go to the Dropbox website at www.dropbox .com and download Dropbox using the link on the homepage. Once you’ve downloaded the executable file, run it. Follow the directions within the install wizard and bingo; you’ve just installed Dropbox on your machine and you’re ready to create and share a folder.

You will find your brand-spankin’ new Dropbox folder on your Desktop. Double-click on it and it opens to show an empty folder. Right-click, just like you would if you were creating a folder in Windows and choose, “New,” and then, “Folder.” Name the new folder and hit OK. Now Right-click again on the folder and choose, “Dropbox,” and then,  “Share this Folder.”

Your browser window will open and take you to the Dropbox website where you can type in the e-mail addresses of the people you would like to share this folder with. Send your invitations to the e-mail address you’ve chosen. Those users must install Dropbox as well and accept your invitation to share the folder. Now, each of you can simply drag and drop files from your computer into this shared folder. No more e-mailing attachments, no more searching for downloaded files. It’s all right there in your shared Dropbox folder. Cool, huh? We thought so, too.

So, how can you use Dropbox with MusicMaster to become more productive? Well, right away, you’ve probably figured out that passing databases around to your Program Director or consultant is going to get pretty easy. However, there are some other ways to use Dropbox and MusicMaster that might save you a lot of heartache someday.

What if you and your consultant wanted to do some work together on the database but he’s in Pensacola today and you’re still back at the station? Storing your data in your shared Dropbox folder allows you and your consultant to work on the same data. You can open MusicMaster, make a change, close MusicMaster and then wait for Dropbox to sync the file so your consultant can open and view the change.

You can also backup your data to your Dropbox folder and download it from anywhere or just archive old backups for safe keeping. To do this, open MusicMaster and head to Tools and then Backup. Choose the “Create,” button. MusicMaster takes you to the Custom Backup Profile options screen. In the description box at the top, call this, “Dropbox Backup.” At the bottom of this screen, look for the Backup Filename field and surf to the Dropbox folder. Click, “Open,” and that will set the path to the Dropbox folder inside the Backup Filename field. Now, click, “OK, “and you will end up back at the Backup screen. Now, you can highlight the Dropbox Backup profile and choose the, “Perform a Custom Backup,” button. MusicMaster will backup the database to your Dropbox folder. See? Now you’ve backed up the data and anyone you share the folder with can grab it and use it. You can also backup databases and keep them safe and online in the event you lose your computer to a crash.

Note: Dropbox is an online resource. It is ALWAYS important to keep a backup on your machine. Dropbox is a great tool to use, but it you lose your internet connection, you also lose Dropbox so keep that in mind.

Dropbox is a great way to pass files to your workmates and colleagues. It’s a great way to share and work on files together and we love using it with MusicMaster. If you think Dropbox might be useful, download it and try it out. Your consultant will thank you for it.

Tuesday, April 5, 2011

Taking a Look "Under The Hood" of MusicMaster

by Aaron Taylor


In this article, we thought it would be helpful to run you through some "under the hood" areas of MusicMaster for Windows that you may have never had the opportunity to see before, or perhaps had poked around in these corners and always thought, "hmm, I wonder what this does" and figured you'd either ask your MSC about these areas, or might read up on those areas someday.  Someday is today! 
This article is meant as an overview to these areas.  We’ll be looking to write more about these areas in the future in more detail.  In the meantime, if you have any questions about these areas, just contact us and we’ll be happy to discuss the areas with you in more detail.

System Information

You can access the following area by going to HELP-SYSTEM INFORMATION, HELP-ABOUT MUSICMASTER-USER INFO, or via the C:\MMWIN directory, look for mmsysinfo.exe (this can be helpful if for whatever reason you are not able to get into the application at a particular time).
If any of these are missing or are out of date, the mmsysinfo.exe file or HELP-SYSTEM INFORMATION file will list them.  Look for the columns of smiley faces on the left.  

If any of them are YELLOW, typically that particular component is out of date and should be upgraded as soon as possible.  If any of the smiley faces are RED, this generally means that the system component is missing and you may have issues with the program operating properly.  Contact your Music Scheduling Consultant immediately if you see any “unhappy” smiley faces and they will work with you to correct this. 


Note that this window can also tell you (or your tech rep) what OS you are running and it’s service pack, and if Daylight Savings is activated on your machine and when it will occur.  Finally, there is an option in the left hand corner for Copy To Clipboard, which allows you to create a more in depth list of the information above to your Clipboard utility in Windows, which can in turn be pasted to a file that can be sent to us for further review if needed.

Tools-Options

This area of MusicMaster for Windows is wide ranging in the number of options that can be configured from here (another separate article could be written to detail all that you can “tweak” from here!)  Major areas of interest here are typically:

Dataset Options/Dataset Identification, where you can adjust the name you’ve given a database change the opening color scheme or add a station logo to the opening screen if you wish.


Audio File Options, which is where you configure MusicMaster to play audio from your automation or an internal drive.


Traffic System Interface, where MusicMaster is configured to accept an incoming traffic/spot log to merge into MusicMaster for timing purposes, or a combined music/traffic export.


Library Editor Options and Schedule Editor Options contain a lot of exciting configuration adjustments you can make to those areas of the application.


Dataset Security, which is where you’ll want to go to configure various user permissions.


Finally, Additional Properties contains a wide variety of setting adjustments for everything from audio to timing tolerance.  The HELP file in MusicMaster does a good job of detailing how each of these are configured and what they control, but don’t hesitate to reach out to your support representative if you have any questions on what can be done in this powerful area of the software.


Release Notes

Whenever MusicMaster for Windows is updated to a new version (see HELP-CHECK FOR UPDATE or mmupdate.exe), this file is added onto.  This is the place to visit if you’d like to find out what has been added or updated to MusicMaster.  This file will also tell you the Microsoft operating systems that MusicMaster is currently supported on, and it also lists (at the top of the file) the major Microsoft components that your machine must include to run the application properly.  Check HELP-SYSTEM INFORMATION (as described above) to verify your machine is up to date with these components.


Export Design Editor (MMExportDesignEditor.exe)

This file resides in the c:\mmwin folder and is the utility that we use to make your export to automation and also library exports (if utilized).  You see the end result in DATASET-SCHEDULE-EXPORT-EXPORT TO AUTOMATION (typically).  Beyond giving you the options to define export designs by category as well as by types of items in the database, the configuration options here are limitless!  You can also import designs in from other databases if you wish.  This is extremely helpful if you are adding a new station to your cluster and already have other MusicMaster databases with working export design for your existing automation system.  Almost anything that you need to get “out” in a text-based file from MusicMaster can be accomplished from here.  If you’d like an overview of this area of the software, or are trying to emulate some sort of information export that you can’t quite figure out, let us know and we’ll likely have some ideas on how it can be done!


Check for Update (MMUpdate.exe)

Find this in the C:\MMWIN folder or by going to HELP-CHECK FOR UPDATES.  This will allow MusicMaster to check our servers for the latest version of MusicMaster your key is licensed to download.  You do need to make sure your machine has internet connectivity at the time you click this for it to function.  Also, you’ll need to be certain that you close MusicMaster completely once the download of the new version is complete and you begin the update procedure.  Admin rights are required when you do the installation.  Typically, the MusicMaster newsletter that you receive each month will let you know if a new update is available, but you can also feel free to check this utility or ask your Music Scheduling Consultant if you are running the latest version.


Tools-User List

Go to TOOLS-USER LIST, if you need to verify that someone else on your network is not also in your database before you make a backup.


Here is another tip, if for whatever reason you have any issues making backups (for example getting a message that indicates the data is in use:

Control-Alt-Delete, will display the Windows Task Manager, which is a fast way to know if MusicMaster is simply open twice on your machine.  If you see it listed twice on this list below, this is a good indication that an instance of the application is stalled out, and may need to be “end tasked” Consult with your MSC if you have any questions on this.


Help-User Registration

This can be helpful to find out if your key is available to upgrade to allow for download of a newer version of MusicMaster, if your MSC asks you to check the serial number of a key (if it becomes damaged and a replacement may be in order) or to simply make certain that your MusicMaster key is able to connect via the internet to our licensing servers.  You often will see a “connecting” message while communication is established and then some information will display in the boxes as shown below.


Thinking File

You will find this file in your C:\mmwin directory listed by call letters if the option is turned on (under DATASET-SCHEDULER-AUTOMATIC SCHEDULER -OPTIONS),  ”save thinking process to disk”.

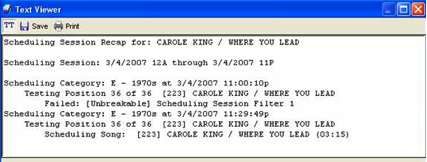
This can be an extremely useful tool in helping to decipher the decision making process that MusicMaster is using when it schedules each category.  Not only can this be viewed via the MMWIN directory on your computer, but it can also be accessed from either the Schedule Editor or Library Maintenance.  From Library Maintenance, load the category and right-click on the song you wish to review. From that context menu, select Scheduling Recap. You will then be able to choose the Current Song, Selected Song(s), Marked Songs or All. MusicMaster will then load the information for review. If you are in the Editor, right-click on the song you wish to review and also select Scheduling Recap.


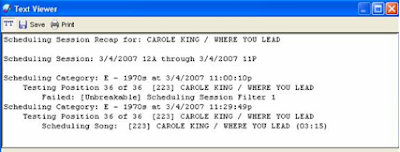
You can also review the Thinking File via the Recap Report (DATASET-SCHEDULE-RECAP REPORT).  This report will show you the decision process MusicMaster went through in the last scheduling session.  It will show you why songs failed before finally choosing a song or leaving the position unscheduled.  This can be very helpful in determining why some songs are not playing.

This is by no means meant to be an all-inclusive overview of the “nooks and crannies” of this incredibly powerful application, but more and intermediate introduction to some of the other areas of the software that a general user may not have been aware of.

As always, please don't hesitate to reach out to your personal MSC, or via support@mmwin.com if you have questions or concerns about something you are doing, would like to be doing, or something that you are seeing in MusicMaster that you have questions about.