Tuesday, March 23, 2010

Start and End Day/Hour

by Paul Ziino

Now that spring is officially here, it's a good time to make plans
for your "summertime songs". You can load them into your database
today, but not allow them to start scheduling until Summer
arrives. Just go to the "Start Day/Hour" field on your song
card. Double-click in that field and select the date and time you'd
like that song to become eligible. You can use "End Day/Hour" to
effectively kill that song at the end of summer, too. And there are
no rules to turn on to make this happen--they're built-in!

This comes in handy for those songs you only want to run June through
August, or only in December, but keep them in the regular rotation
categories all the time.

Monday, March 22, 2010

Daily Backups by Marianne Burkett


 I hate to nag...but please do your backups everyday :)... Tools/Backup. Thank you.

Friday, March 19, 2010

Scheduling Countdowns!

by Marianne Burkett


So, you’ve decided to do a daily Countdown or perhaps a larger scale “Top 100” Countdown this weekend. In MusicMaster – whether it’s top 5 or 500 songs – you can automatically generate that Song List with the History Browser!


Dataset/Analysis/History Browser. Select your frame of time and which Music Categories you’d like included in the countdown. Set up the Details tab with “Individual Songs”. Go down the list and pick your number and press okay.


Doing this will Open the Browser Report in order of Rank & Spins. Save as List

This will create a new Song List.


After you’ve created your Song List, right click on the song list and open the song list editor to make whatever tweaks you’d like to the list, like Reversing the Order so the number 1 song is at the end of the countdown.


Then, in your clocks – you’ll be using Element Type “Saved List”. Plug the List directly into the clocks (be sure to begin with “First”). Typically you’d have 2 clocks: the start of the countdown clock and then the continuation clock, which would begin with Saved List “Next”.


Plug those clocks into the assignment grid and you are done. Run the Automatic Scheduler. The list lays down first without looking at rules and then the rest of your music and non-music will schedule around it.


Happy Scheduling!

The Autoburn Spreadsheet


Dataset, Schedule, Autoburn offers a new feature called Display Burn Spreadsheet. This is very handy for categories that don’t follow certain rules and use a search depth of 1. In the Autoburn screen, put a checkmark next to Display Burn Spreadsheet. MusicMaster shows how each record schedules in the spreadsheet at the bottom of the screen. You can easily cycle through each hour of the day creating customized burn settings until you achieve perfect rotations! Cool, huh! ~ Drew Bennett 


Wednesday, March 3, 2010

Clock Element Type: Combo

By Paul Ziino

A Combo element allows you to select any number of your categories. When MusicMaster starts the auto-schedule process, it will attempt to fill that Combo position with a song from the first category selected in that position, based on the Schedule Properties. Let’s assume your pass list in Dataset/Schedule/Schedule Properties goes A-B-C-D-E.


Now let’s assume your Combo element is set to choose a song from C, D, and E with a “Step down” criteria set to Unbreakable.


MusicMaster will schedule the A and B category positions—they are in pass 1 and 2 in Schedule Properties. Then MusicMaster will schedule the C category positions. When it comes to this Combo element, MusicMaster will look at the songs in the depth as set in Schedule Properties. If a C works, MusicMaster will schedule it and move on. But if none of those songs pass all the Unbreakable rules, the position will be left unscheduled until the next pass which is category D. MusicMaster will attempt to fill that combo element with a D. If a D from the available depth works, it will be scheduled. If not, then MusicMaster will step down to the E category. Now if an E works in that position, it will be scheduled. But if no E works, the position will be left unscheduled, allowing you to manually fill it in the schedule editor. In this example, the Combo element basically gave MusicMaster three opportunities to fill that position before leaving it unscheduled.

When you want MusicMaster to have more flexibility in auto-scheduling, Combo positions can be a great option.

We’re Countin’ ‘Em Down All Weekend Long!

By Drew Bennett

Back in the day, (I won’t say what day because it will seriously date me) I was in charge of scheduling the music at an AC station in Kansas City. It’s gone now but it was a great station and I enjoyed the people I got to work with. We really tried to make our station compelling and special programming was something we focused on to really try and stand out. I’m sure you’ve done all of that, too. If you’ve been around as long as I have, you’ll remember the days when you scheduled your themed weekends and countdowns by hand…with index cards…in a cave…before we invented fire. That’s what we did in Kansas City and I always swore there had to be a better way. Well, you can come out of the cave now! You don’t have to schedule by hand anymore. In MusicMaster for Windows, Song Lists and Saved List Elements will help you automate the whole thing.

The first thing you want to do is create a Song List. A song list can contain songs that are in order, e.g. a song list created for a countdown where the songs will schedule one right after the other, or it can contain songs that share some sort of commonality, e.g. a song list created for a group of songs that contain the word, ‘Love, ‘in the title. You can query the library for those songs and create a Song List with them. For more on creating Song Lists, see Song Lists in the MusicMaster for Windows Help section of the software. You might also wish to view our training video on this subject.

After you create your Song List, it is time to create the clock that you will use in your assignment grid to schedule the specialty show. By now, you are familiar with some of the elements you can use in a clock. If you have not explored the Saved List element, now is the time to get familiar with it. A Saved List element schedules a song using a Song List. When you choose to use a Saved List element in a clock, the following screen will appear and ask you to make some setting changes.


See that dropdown box? You can change that to import a specific Song List you have available in your database or can choose to leave it to its’ default setting: [Use Session List]. When this setting is used, MusicMaster allows you to choose the Saved List you want to use in this element right before you schedule a day. I’ll show that feature to you in just a bit. For now, let’s focus on the basic settings of this element. If you look at the Import Options of this element, you’ll note the various methods you can use to schedule a song. Once you’ve made your settings changes click OK and MusicMaster places the element within the clock. Themed weekend clocks might have as few as one or two Song List elements in them while Countdown clocks might consist of nothing but Saved List elements and Lognotes. Either way, setting up the Saved List element is the same for each.

Once you have set up your Song List and clock and you have assigned your clock to the active assignment grid, you are ready to schedule. If, when creating your clocks, you used the [Use Session List] option in your Saved List element, you will want to note a crucial step in the successful scheduling of your Song List. When you choose to automatically schedule your day, you will need to define the Song List you will be using for that particular scheduling session.


Find the Session Song List section in the Session tab of the Automatic Scheduler. Here, you will use the dropdown box to tell MusicMaster which Song List you will be using to schedule with during this scheduling session. This is a great feature because it allows you to create clocks that can be used with any Song List you choose right before you begin scheduling a day. It saves you time and effort when creating your themed weekends and countdowns.

Once you have scheduled a day using your Song List and Saved List elements, check the log using the Schedule Editor to make sure your hard work paid off. If you set up your Song List and clocks correctly, you should see a perfectly scheduled weekend or countdown using the Song List you made. No more scheduling by hand! Good luck with scheduling logs using Songs Lists and if you have any questions, please don’t hesitate to call your Music Scheduling Consultant. We are always here to help!

Daylight Savings Time – Spring Forward

By Aaron Taylor

This is one of the two times of the year that we start getting calls and e-mails about Daylight Savings Time. How does MusicMaster handle it? Is there anything special that I need to do? Where can I check to make sure we are set up correctly? In most cases, you won't need to do anything within the settings of the MusicMaster program (or your individual database) to ensure that you'll "spring forward and fall back."

As a reminder, (in the US and Canada) Daylight Savings Time always begins on the second Sunday of March, and ends on the first Sunday of November. This means that, on March 14, 2010, at 2:00 a.m. - you set the clocks ahead one hour. (Spring forward) and on Sunday, November 7, 2010, at 2:00 a.m. - you set the clocks back an hour. (Fall back).

MusicMaster for Windows follows the Daylight Savings setting for the individual computer the application is run on. You will find the configuration of this typically in the right hand corner of your taskbar, by left double-clicking your mouse on the clock. This will take you to the "Date and Time Properties" box. Select the "Time Zone" tab and see if the square for "Automatically adjust clock for daylight savings changes is checked." MusicMaster follows the machine directives on how/if to adjust for daylight savings time. To verify within MusicMaster that this is set and active, go to HELP-SYSTEM INFORMATION. You will see a variation of the window below and line number two at the top of the window will reference the DST information.
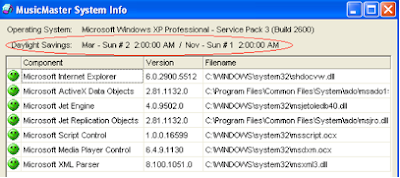


If you do not see this information displayed in MusicMaster and the time properties tab is set, you may need to visit the Microsoft support page for this topic to make certain you have the most up-to-date program updates for DST for your operating system (we’ve created a page to help you access those resources, more on that a bit later in this article).

What specifically will happen when this is active in the MusicMaster clocks and scheduling process? In the spring, on the weekend the switch occurs, MWIN will make the 2am hour “disappear” and in the fall, the 2am hour will double, with the clock content repeated twice. You will see a note in the Schedule Editor hour where this occurs, stating either “MusicMaster: Hour doubled due to Daylight Savings” or “MusicMaster: Hour removed due to Daylight Savings.”

If you are in an area of the country or the world that does not recognize Daylight Savings Time, you do have the option of overriding the machine setting in MusicMaster itself. Just go to Tools, Options, Dataset Options, Additional Properties. The Schedule section has an option for IgnoreDST. A setting of 1 will disable the Daylight Saving Time feature.
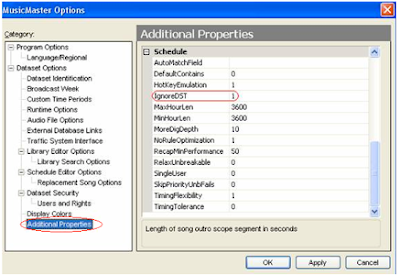


We have created a page on the MusicMaster website that has a wealth of additional information on this topic that you may want to visit or bookmark for the future, visit http://www.mmwin.com/dst/

Important Tip: It will be just as important to discuss how Daylight Savings is handled with your traffic and automation system vendor. It is certainly possible that some additional adjustments may need to be made in the configuration or settings in that other hardware/software (or perhaps your MMWIN clocks) to make certain that on that Sunday at two in the morning everything goes off without a hitch.

As always, if you have any questions about this topic (or your specific circumstances) please “make the time” to discuss this with your Music Scheduling Consultant.