Monday, January 31, 2011

Technical Problem in MusicMaster SR-20

by Joe Knapp


There was a problem in the new release of MusicMaster, Service Release 20, that involves Rule Groups that use the "Ignore Plays Outside This Time Period" option. This problem would cause un-flagged rule violations for certain rules placed inside these Rule Groups.  We have already fixed this problem. We are testing this stuff again so we can release a corrected update as quickly as possible.

In the meantime, SR-20 has been removed from our servers. We'll let you all know when it's available. If you've already installed SR-20, you can easily go back to SR-19 until the new update is available. This is only necessary if you are using this feature in any of your Rule Groups. Most people do not.

We are very grateful to the people who reported this problem to us.  We do a ton of testing before we release new software updates. But, despite our best efforts, this one slipped through the cracks, and we're very sorry about that.


Monday, January 24, 2011

What's New in MusicMaster 4.0 SR 20.

Service release 20 has just been issued. Here's some information about a few cool toys we've added!

Artist Keywords

by Paul Ziino

The question has come up, “How do I best use Artist Keywords?”  Today we answer that question.

In most databases there are two artist fields: one is for the artist’s name as you’d like it to appear in your logs and reports (Artist), the other is used to test for artist separation (Artist Keywords).  In many cases the Artist and the Artist Keyword fields will contain the same information: Aerosmith, Brooks and Dunn, Pink, etc.  But in other situations the data in each will vary.

Many artists feature other “guest stars” on their songs.  Let’s look at “Telephone” by Lady Gaga f/Beyonce.  Your Artist Keywords on that song would be:

1) Lady Gaga
2) Beyonce
3) Destiny’s Child

To enter multiple keywords on a song, double-click in the Artist Keywords field in Library Maintenance (song card or grid view) to access the Keyword Entry box and enter the primary keyword in the first field, followed by the others and click Apply/OK.  Your entry box will look like this:


Now any time “Telephone” is scheduled, it will follow the Artist Keyword rules for each keyword assigned to that song.

Let’s use another example of “We Are the World” which featured more than 20 soloists.  If we wanted to, we could list each one as a unique Artist Keyword on that song, and MusicMaster would test the rules for every keyword assigned.  In the picture below you’ll notice that only the first (primary) keyword displays in the Artist Keywords field, but that when we hover on that field with “Show Balloon Tips” enabled, we see all the keywords assigned…


You’ll also notice that we listed them all with their last names first.  This is done for consistency and for sorting purposes.  Ultimately it doesn’t matter how you enter the keywords so long as it is consistent.  In other words…RICHIE, LIONEL and LIONEL RICHIE are two different keywords as far as MusicMaster is concerned.

Now let’s take this one step further.  Let’s assume we are programming an oldies station that plays 60s and 70s music, so we’re going to play songs by the Beatles and by each of the members of the band.  So how do we set up Artist Keywords in this situation?  This depends on your programming philosophy.  If you want to make sure that songs by the group are separated from songs by the soloists, but the soloists needn’t be separated from one another, you would use the Artist Keywords like this…

“Hey Jude” by The Beatles


“Imagine” by John Lennon


Because Lennon’s keyword is listed on the group song as well as the solo song, it will prevent them from playing too close to one another, based on your time separation rules for these keywords.  And since the other keywords for McCartney, Harrison, and Starr are absent from “Imagine”, songs by those individuals will not be in violation of any artist keyword separation rules.

If you want to keep the soloists’ songs separated from one another and from songs by the group, your Artist Keyword entry would be the same for “Hey Jude”, but you would add Beatles as a second keyword on “Imagine”…

“Imagine” by John Lennon


You would also list Beatles as a second keyword on any solo songs by Paul, George, and Ringo.  As a result, all the songs by the Beatles or by any of its members will be separated from one another based on the rules for those keywords.  You can apply this same methodology to any group/soloist scenario: The Eagles, Van Halen, The Jackson Five, and so on.

One step further

In some formats where artists frequently make guest appearances on songs by others, it is sometimes beneficial to have two Artist Keyword fields.  The first one would be for your primary artist keyword and the second for any guest performers.  Take for example a song by Eminem that features Dr. Dre.  Let’s assume Dr. Dre’s part on this song is pretty minimal, and he is making similar appearances on songs by Akon and by Lil Kim and let’s assume all three of these songs are in Heavy Currents…none of them will ever get aired because of Dr. Dre’s artist separation time.  If we had a “Guest Keywords” field, Dr. Dre could be listed there instead of as a second Artist Keyword in that field.  Your rules could be set that an Artist Keyword has to be separated from itself by 50 minutes, but a Guest Keyword only needs 10 minutes of separation.  Now those three songs would be able to play because Dr. Dre’s keyword wouldn’t be holding them back.

Another step further

Want to clean up your Keywords?  Go to Dataset/Library/Keywords and use the drop-down to select Artist Keywords to see a list of all the artist keywords in the entire database.  Here you can edit the keywords and it will have a mass change effect on your data.  Let’s use Beatles as an example.  BEATLES is different from THE BEATLES which is different from BEATLES, THE.  Make them all consistent to maximize effect of the artist keyword rules.  We’ll discuss this in more detail in a future article, as well as dive into the Keyword Separation Wizard.

In conclusion, Artist Keywords are essential to accurate scheduling in MusicMaster.  Taking the time to set them up properly and consistently will enable artist separation to be much more effective and will make log editing more efficient.

Monday, January 17, 2011

Queries

by Paul Ziino

A query in MusicMaster is the equivalency of a library search.  You can save queries in the database that can be used in the library as well as in the schedule editor.  Today we discuss a few of the options available to you in queries.

Saved Queries

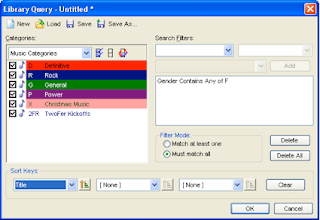
First off, let’s talk about creating a query in general.  For starters, go to Dataset/Library/Query the Library/New Query.  This opens the Library Query box.  Here you can select which categories to include in the query, as well as your search filters and sort keys.  Let’s assume we are looking for all songs with Gender F (Female), and we only want to look in our music categories, and we’d like the list sorted alphabetically by Title.  Check only the Music categories.  Under Search Filters, use the pull-down to select the Gender field, then the operator is “Contains Any of”, select the desired code, and click Add.  Under Sort Keys, in the first box use the pull-down to select the Title field.  Your Library Query box will look like this…


If we just click OK, MusicMaster will instantly pull a library search of just those items you’ve requested.  But if we want to be able to run this exact query in the future, we would want to save it.  To do so, click the “Save As” button, enter a New Query Name, and click “Save”.


Now you can automatically open this query in MusicMaster by going to Dataset/Library/Query the Library/Saved Query, select the desired query from the list and click Load.  The query will search the selected categories each time it is run—so as your library changes, the results of your query will change, too.

When in the Schedule Editor, you can right-click on a position then select Schedule Song/Search using a Saved Query, and then select the desired query.  The results of that saved query will populate your Replacement Window, and you’ll be able to select a song from the list.

Prompted Queries

Like a Saved Query, you can use a prompted query to search the library based on a set of criteria.  The key here is that we can tell the query to allow you to select the parameters when you launch it.  Here’s how…

To create the query, go to Dataset/Library/Query the Library/New Query.  Again, let’s assume we want to include only music categories.  Under Sort Keys, use the pull-down to select the Run Time field.  Under Search Filters select the Run Time field, with an operator of “Greater than or equal to” and in the last box we’ll enter “@PROMPT(Run Low)”.  Then click Add.  Your query box will look like this…


Then add another Search filter for Runtime  “Less than or equal to” and “@PROMPT(Run High)”.  Add that filter, and now click Save As and label it as Runtime High/Low or something similar and Save it.

Now when you launch the Runtime High/Low query, your Query Prompts box will appear, and it will look like this…


Enter your lowest desired runtime in the Run Low field, and your highest in the Run High field, click Continue and your list of songs will be all those that fall within the desired range.  For this sample, we did Run Low=3:10 and Run High=3:20.  The results…


When you save prompted queries they are included with the other Saved Queries in the database, and are available in all the same places.

How and Where to Access Saved Queries

There are several ways to access your saved queries.  Here is a list of them…

1. Click on Dataset/Library/Query the Library/Saved Query

2. In the Info Bar (View/Info Bar), on the music tab, Queries is one of the available panels.

3. When Library Maintenance is already open, click the New Query icon (binoculars, first icon on left) and click Load, then choose the desired saved query.

4. Also when Library Maintenance is already open, click the drop-down arrow to the right of the Favorite Query icon (third icon from left) and select your favorite.

5. In Schedule Editor, right-click on a position and select Schedule Song/Search Using a Saved Query, then choose the desired query.

Using Saved Queries can speed up your editing process and save you a lot of steps in the future.