Friday, March 25, 2011

Scheduling Intros

By: Paul Ziino

Lots of MusicMaster customers use Segue Protection rules to make sure slow songs don’t segue into fast songs or to prevent female artists from playing back-to-back.  But have you ever considered using Segue Protection to match the talk-over times to the appropriate song intros?  This is the question we get:

“I have a song with a 12 second intro.  I want to make sure that the imaging piece before it will go over the ramp of the song and meet the post.  Is that possible?”

The answer is YES!  First you’ll need a field in your database that can accommodate the coding necessary to do this.  An unused Attribute-Overall field will work, or an Attribute-Multiple field can work as well.

Step one: Create the appropriate codes.  To do this, go to Dataset/Library/Attributes.  Use the pull-down at the top to select the desired attribute field.  Make sure you enter the number of seconds in the Value field as well as the description, so that the field sorts in the correct order.


You can choose whatever single characters you wish for the codes, however we would recommend using something intuitive.  For example, we’ve used codes 0-9 for intro times of zero to nine seconds.  We used Shift-1 (!) for 11, Shift-2 (@) for 12, and so on.

Step two: Code the library.  Query the library for songs where Intro equals X.


Then, add the X code to the Talk-Over field.  Then do a new query for Intro equals Y, then add the Y code to the Talk-Over field, and so on.  When you are finished, the library should look something like this…


Do the same thing with your Imaging categories so that dry imaging has the appropriate talk-over attribute code assigned.  Produced imaging should be assigned the code for 0 seconds.

Step three: Create the rule.  In the Rule Tree, open the Imaging category (or categories).  Then under “Attribute Field Rules” find the Talk-Over field, then the Segue Protection rule.  Drag and drop that rule into the appropriate Imaging category.  It should be set up so that a code can only segue into itself, the rule should only test forward, and it should ignore non-music.


We Test Forward and ignore Non-Music so that the imaging only looks at the next scheduled music item in the log and doesn’t look at anything scheduled before it.

Step four: Set your Schedule Properties.  Go to Dataset/Schedule/Schedule Properties.  Make sure the Imaging category is scheduling later in the pass order than the music categories.  Also, you’ll want to give the category a 100% depth so that MusicMaster can look at every item in the category.

TIP: You’ll probably want multiple imaging pieces for each Talk-Over code to prevent the exact same item from playing over the ramp each time that length is required.

Another variation of this question is…

“I want to have MusicMaster schedule imaging that matches the tempos of the music on either side.”

You can use the same steps for matching tempos of imaging to the song that follows.  And if you are using an Attribute-Combo or Attribute-In/Out field for Tempo, you can actually test Forward and Backward…that way the first code of the field is the beginning and the last code of the field is the ending.  For example…

Codes are S, M, and F for Slow, Medium and Fast.  In an Attribute-In/Out field, your songs would be SS=Slow In/Slow Out, SM=Slow In/Medium Out, SF=Slow In/Fast Out, MS=Medium In/Slow Out, and so on.  Then you would set up your segue protection grid like this:


Notice we are testing forward and backward.  This will give you the desired sweeping effect.  You have two songs scheduled with imaging between.  The first song ends Slow, the second song starts Fast.  When MusicMaster plots the imaging piece in between, it will pick one with a tempo of SF, so the imager starts Slow and ends Fast, perfectly sweeping between your two music elements!

Note: With an Attribute-Combo field, segue protection only looks at the first and last code.  The middle code would be used in other rules applicable to that field.

There are a lot of ways you can put the Segue Protection rule to use: Year intros, Harmonic Key segues, and more.  If you have questions, you can always connect with your Music Scheduling Consultant for answers.

Friday, February 18, 2011

Three Important Lessons in Caring for Your MusicMaster Database

by Marianne Burkett

Clients contact me for all types of reasons. Let's take a look at three different scenarios.

Scenario A:

The Program is not  responding normally to commands.  You stroll to your desk on Monday morning and try to open the database and get this message:


The very first thing to do when you see this message is to check your Windows Task Manager.  If you’re uncertain about how to open the Task Manager you can press “Control-Alt-Delete” simultaneously and it will come up. You can also right click on any gray space on your Task Bar and you’ll find it on the menu that pops up there.  Once you have the Task Manager open, check the Applications tab and see which programs are running.  You may see MusicMaster running twice.


Simply close both instances using the Task Manager.  If you network your data, make sure nobody else in your network is accessing the database. If need be, check the task manager of each workstation capable of opening the database. After you are certain nobody else is accessing the database, reopen MusicMaster and run Tools/Purge. If that does not clear up your errors, contact your Music Scheduling Consultant.

Scenario B:

Closing MusicMaster improperly during a scheduling session.   If for some reason, you’re in the        middle of a scheduling session, running the auto scheduler or editing logs and you experience a sudden power outage or your computer freezes up and you have to reboot. This can cause errors in the database.   In most of these cases, you’ll need to call your Music Scheduling consultant right away or restore your most recent backup. This is why I always stress the importance of doing daily backups of the database.  Tools-Backup-Create a Standard Backup. Only attempt backups when the database is being accessed by one user!

Scenario C:


Database is bloated and sluggish.   There is no politically correct way to put this, but if you don’t Automatically Purge your log history, your database will grow like someone on the “All Fast Food Diet.” The larger it gets, the slower it performs. Check your default settings at Dataset-Schedule-Purge History and make sure it is set to “Automatically Purge.”  By default, we set it at 90 days and 8 song histories.


It’s really up to you.  As you increase the number of days (these are logs you can access via the Schedule Editor), your database will become larger. Purging log histories simply means your song histories are archived. You don’t lose your histories!

I do not recommend having less that 20 days of active logs.  When running your history purge, do NOT interrupt the software. It may look like it’s not working, but be patient and allow the purge to process. Once the purge is completed the utility will disappear. At that point, run Tools-Purge to get the database down to its optimum size.

Understanding how to care for your databases, doing daily backups and taking proper care of your Windows system overall health will yield trouble-free Music scheduling. If you have any questions or concerns, feel free to contact the Support Team at MusicMaster.

Tuesday, February 1, 2011

Ideal Turnovers

By Drew Bennett

Let’s say you have the rare opportunity to totally overhaul your database. You’ve been thinking about new clocks and rotations and you want to get started on bringing better rotations to your station.

When it comes to scheduling music, clocks are ‘where the magic happens.’ If you have great clocks that encourage a natural rotation of your category, your rules can be there as a safety net and not as a fix. Your goal should be to achieve perfect rotation at the clock level. Many times, clocks aren’t giving you the rotation you need. Rules that prevent eye-sores, like harmonics and stacking, are there to fix a problem that really needs to be addressed in the clocks themselves (and not necessarily the Rule Tree.)

When you begin the process of building clocks that achieve these perfect rotations you are looking for, MusicMaster has a simple but very effective tool to help you create great clocks. It’s called the Turnover Calculator and you will find it in Analysis.


When you get to Analysis, look at the middle of the screen on the right and you should see a group of icons. The Turnover Calculator has been circled in the example above.

Let’s say you have a category of 27 songs and would like to come up with clocks that achieve perfect rotation for the category. How many times should you call for the category in an hour? The Turnover Calculator will help you find that out.


In the example above, we entered the number, 27, in the Slot Count field because that is the number of records we have in the category. To find out basic turnover information for that category, and to see how our songs will rotate through the day, we will enter the average number of times we plan to call for the category in a clock. In this case, we entered 2 in the Average Per Hour field. Now, we can click the Calculate button to the right of the Average Turnover field and find out what the average turnover will be for the category. MusicMaster will show a graphical representation of the rotation of the category at the bottom of the Turnover Calculator. In the example above, our 27 songs are rotating perfectly as long as we call for the category twice per hour. Those values can be changed and tweaked until perfect rotations are achieved.

Once you are armed with the number of songs you have in a category the Turnover Calculator is there for you to determine how many times you need to call for the category in a clock and throughout the day on the Assignment Grid.

When you have perfect rotations to begin with, your rules become a safety net and you can focus on creating rules that develop the spirit and the sound of your radio station as opposed to applying rules that fix imperfect rotations at the clock level.

The Turnover Calculator is a simple piece of the software but it will prove to be invaluable in your quest to rotate your songs the best way possible.

Monday, January 31, 2011

Technical Problem in MusicMaster SR-20

by Joe Knapp


There was a problem in the new release of MusicMaster, Service Release 20, that involves Rule Groups that use the "Ignore Plays Outside This Time Period" option. This problem would cause un-flagged rule violations for certain rules placed inside these Rule Groups.  We have already fixed this problem. We are testing this stuff again so we can release a corrected update as quickly as possible.

In the meantime, SR-20 has been removed from our servers. We'll let you all know when it's available. If you've already installed SR-20, you can easily go back to SR-19 until the new update is available. This is only necessary if you are using this feature in any of your Rule Groups. Most people do not.

We are very grateful to the people who reported this problem to us.  We do a ton of testing before we release new software updates. But, despite our best efforts, this one slipped through the cracks, and we're very sorry about that.


Monday, January 24, 2011

What's New in MusicMaster 4.0 SR 20.

Service release 20 has just been issued. Here's some information about a few cool toys we've added!

Artist Keywords

by Paul Ziino

The question has come up, “How do I best use Artist Keywords?”  Today we answer that question.

In most databases there are two artist fields: one is for the artist’s name as you’d like it to appear in your logs and reports (Artist), the other is used to test for artist separation (Artist Keywords).  In many cases the Artist and the Artist Keyword fields will contain the same information: Aerosmith, Brooks and Dunn, Pink, etc.  But in other situations the data in each will vary.

Many artists feature other “guest stars” on their songs.  Let’s look at “Telephone” by Lady Gaga f/Beyonce.  Your Artist Keywords on that song would be:

1) Lady Gaga
2) Beyonce
3) Destiny’s Child

To enter multiple keywords on a song, double-click in the Artist Keywords field in Library Maintenance (song card or grid view) to access the Keyword Entry box and enter the primary keyword in the first field, followed by the others and click Apply/OK.  Your entry box will look like this:


Now any time “Telephone” is scheduled, it will follow the Artist Keyword rules for each keyword assigned to that song.

Let’s use another example of “We Are the World” which featured more than 20 soloists.  If we wanted to, we could list each one as a unique Artist Keyword on that song, and MusicMaster would test the rules for every keyword assigned.  In the picture below you’ll notice that only the first (primary) keyword displays in the Artist Keywords field, but that when we hover on that field with “Show Balloon Tips” enabled, we see all the keywords assigned…


You’ll also notice that we listed them all with their last names first.  This is done for consistency and for sorting purposes.  Ultimately it doesn’t matter how you enter the keywords so long as it is consistent.  In other words…RICHIE, LIONEL and LIONEL RICHIE are two different keywords as far as MusicMaster is concerned.

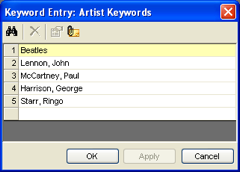
Now let’s take this one step further.  Let’s assume we are programming an oldies station that plays 60s and 70s music, so we’re going to play songs by the Beatles and by each of the members of the band.  So how do we set up Artist Keywords in this situation?  This depends on your programming philosophy.  If you want to make sure that songs by the group are separated from songs by the soloists, but the soloists needn’t be separated from one another, you would use the Artist Keywords like this…

“Hey Jude” by The Beatles


“Imagine” by John Lennon


Because Lennon’s keyword is listed on the group song as well as the solo song, it will prevent them from playing too close to one another, based on your time separation rules for these keywords.  And since the other keywords for McCartney, Harrison, and Starr are absent from “Imagine”, songs by those individuals will not be in violation of any artist keyword separation rules.

If you want to keep the soloists’ songs separated from one another and from songs by the group, your Artist Keyword entry would be the same for “Hey Jude”, but you would add Beatles as a second keyword on “Imagine”…

“Imagine” by John Lennon


You would also list Beatles as a second keyword on any solo songs by Paul, George, and Ringo.  As a result, all the songs by the Beatles or by any of its members will be separated from one another based on the rules for those keywords.  You can apply this same methodology to any group/soloist scenario: The Eagles, Van Halen, The Jackson Five, and so on.

One step further

In some formats where artists frequently make guest appearances on songs by others, it is sometimes beneficial to have two Artist Keyword fields.  The first one would be for your primary artist keyword and the second for any guest performers.  Take for example a song by Eminem that features Dr. Dre.  Let’s assume Dr. Dre’s part on this song is pretty minimal, and he is making similar appearances on songs by Akon and by Lil Kim and let’s assume all three of these songs are in Heavy Currents…none of them will ever get aired because of Dr. Dre’s artist separation time.  If we had a “Guest Keywords” field, Dr. Dre could be listed there instead of as a second Artist Keyword in that field.  Your rules could be set that an Artist Keyword has to be separated from itself by 50 minutes, but a Guest Keyword only needs 10 minutes of separation.  Now those three songs would be able to play because Dr. Dre’s keyword wouldn’t be holding them back.

Another step further

Want to clean up your Keywords?  Go to Dataset/Library/Keywords and use the drop-down to select Artist Keywords to see a list of all the artist keywords in the entire database.  Here you can edit the keywords and it will have a mass change effect on your data.  Let’s use Beatles as an example.  BEATLES is different from THE BEATLES which is different from BEATLES, THE.  Make them all consistent to maximize effect of the artist keyword rules.  We’ll discuss this in more detail in a future article, as well as dive into the Keyword Separation Wizard.

In conclusion, Artist Keywords are essential to accurate scheduling in MusicMaster.  Taking the time to set them up properly and consistently will enable artist separation to be much more effective and will make log editing more efficient.

Monday, January 17, 2011

Queries

by Paul Ziino

A query in MusicMaster is the equivalency of a library search.  You can save queries in the database that can be used in the library as well as in the schedule editor.  Today we discuss a few of the options available to you in queries.

Saved Queries

First off, let’s talk about creating a query in general.  For starters, go to Dataset/Library/Query the Library/New Query.  This opens the Library Query box.  Here you can select which categories to include in the query, as well as your search filters and sort keys.  Let’s assume we are looking for all songs with Gender F (Female), and we only want to look in our music categories, and we’d like the list sorted alphabetically by Title.  Check only the Music categories.  Under Search Filters, use the pull-down to select the Gender field, then the operator is “Contains Any of”, select the desired code, and click Add.  Under Sort Keys, in the first box use the pull-down to select the Title field.  Your Library Query box will look like this…


If we just click OK, MusicMaster will instantly pull a library search of just those items you’ve requested.  But if we want to be able to run this exact query in the future, we would want to save it.  To do so, click the “Save As” button, enter a New Query Name, and click “Save”.


Now you can automatically open this query in MusicMaster by going to Dataset/Library/Query the Library/Saved Query, select the desired query from the list and click Load.  The query will search the selected categories each time it is run—so as your library changes, the results of your query will change, too.

When in the Schedule Editor, you can right-click on a position then select Schedule Song/Search using a Saved Query, and then select the desired query.  The results of that saved query will populate your Replacement Window, and you’ll be able to select a song from the list.

Prompted Queries

Like a Saved Query, you can use a prompted query to search the library based on a set of criteria.  The key here is that we can tell the query to allow you to select the parameters when you launch it.  Here’s how…

To create the query, go to Dataset/Library/Query the Library/New Query.  Again, let’s assume we want to include only music categories.  Under Sort Keys, use the pull-down to select the Run Time field.  Under Search Filters select the Run Time field, with an operator of “Greater than or equal to” and in the last box we’ll enter “@PROMPT(Run Low)”.  Then click Add.  Your query box will look like this…


Then add another Search filter for Runtime  “Less than or equal to” and “@PROMPT(Run High)”.  Add that filter, and now click Save As and label it as Runtime High/Low or something similar and Save it.

Now when you launch the Runtime High/Low query, your Query Prompts box will appear, and it will look like this…


Enter your lowest desired runtime in the Run Low field, and your highest in the Run High field, click Continue and your list of songs will be all those that fall within the desired range.  For this sample, we did Run Low=3:10 and Run High=3:20.  The results…


When you save prompted queries they are included with the other Saved Queries in the database, and are available in all the same places.

How and Where to Access Saved Queries

There are several ways to access your saved queries.  Here is a list of them…

1. Click on Dataset/Library/Query the Library/Saved Query

2. In the Info Bar (View/Info Bar), on the music tab, Queries is one of the available panels.

3. When Library Maintenance is already open, click the New Query icon (binoculars, first icon on left) and click Load, then choose the desired saved query.

4. Also when Library Maintenance is already open, click the drop-down arrow to the right of the Favorite Query icon (third icon from left) and select your favorite.

5. In Schedule Editor, right-click on a position and select Schedule Song/Search Using a Saved Query, then choose the desired query.

Using Saved Queries can speed up your editing process and save you a lot of steps in the future.