Service release 20 has just been issued. Here's some information about a few cool toys we've added!
Monday, January 24, 2011


Artist Keywords
by Paul Ziino
The question has come up, “How do I best use Artist Keywords?” Today we answer that question.
In most databases there are two artist fields: one is for the artist’s name as you’d like it to appear in your logs and reports (Artist), the other is used to test for artist separation (Artist Keywords). In many cases the Artist and the Artist Keyword fields will contain the same information: Aerosmith, Brooks and Dunn, Pink, etc. But in other situations the data in each will vary.
Many artists feature other “guest stars” on their songs. Let’s look at “Telephone” by Lady Gaga f/Beyonce. Your Artist Keywords on that song would be:
1) Lady Gaga
2) Beyonce
3) Destiny’s Child
To enter multiple keywords on a song, double-click in the Artist Keywords field in Library Maintenance (song card or grid view) to access the Keyword Entry box and enter the primary keyword in the first field, followed by the others and click Apply/OK. Your entry box will look like this:

Now any time “Telephone” is scheduled, it will follow the Artist Keyword rules for each keyword assigned to that song.
Let’s use another example of “We Are the World” which featured more than 20 soloists. If we wanted to, we could list each one as a unique Artist Keyword on that song, and MusicMaster would test the rules for every keyword assigned. In the picture below you’ll notice that only the first (primary) keyword displays in the Artist Keywords field, but that when we hover on that field with “Show Balloon Tips” enabled, we see all the keywords assigned…

You’ll also notice that we listed them all with their last names first. This is done for consistency and for sorting purposes. Ultimately it doesn’t matter how you enter the keywords so long as it is consistent. In other words…RICHIE, LIONEL and LIONEL RICHIE are two different keywords as far as MusicMaster is concerned.
Now let’s take this one step further. Let’s assume we are programming an oldies station that plays 60s and 70s music, so we’re going to play songs by the Beatles and by each of the members of the band. So how do we set up Artist Keywords in this situation? This depends on your programming philosophy. If you want to make sure that songs by the group are separated from songs by the soloists, but the soloists needn’t be separated from one another, you would use the Artist Keywords like this…
“Hey Jude” by The Beatles
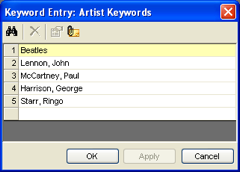
“Imagine” by John Lennon

Because Lennon’s keyword is listed on the group song as well as the solo song, it will prevent them from playing too close to one another, based on your time separation rules for these keywords. And since the other keywords for McCartney, Harrison, and Starr are absent from “Imagine”, songs by those individuals will not be in violation of any artist keyword separation rules.
If you want to keep the soloists’ songs separated from one another and from songs by the group, your Artist Keyword entry would be the same for “Hey Jude”, but you would add Beatles as a second keyword on “Imagine”…
“Imagine” by John Lennon

You would also list Beatles as a second keyword on any solo songs by Paul, George, and Ringo. As a result, all the songs by the Beatles or by any of its members will be separated from one another based on the rules for those keywords. You can apply this same methodology to any group/soloist scenario: The Eagles, Van Halen, The Jackson Five, and so on.
One step further
In some formats where artists frequently make guest appearances on songs by others, it is sometimes beneficial to have two Artist Keyword fields. The first one would be for your primary artist keyword and the second for any guest performers. Take for example a song by Eminem that features Dr. Dre. Let’s assume Dr. Dre’s part on this song is pretty minimal, and he is making similar appearances on songs by Akon and by Lil Kim and let’s assume all three of these songs are in Heavy Currents…none of them will ever get aired because of Dr. Dre’s artist separation time. If we had a “Guest Keywords” field, Dr. Dre could be listed there instead of as a second Artist Keyword in that field. Your rules could be set that an Artist Keyword has to be separated from itself by 50 minutes, but a Guest Keyword only needs 10 minutes of separation. Now those three songs would be able to play because Dr. Dre’s keyword wouldn’t be holding them back.
Another step further
Want to clean up your Keywords? Go to Dataset/Library/Keywords and use the drop-down to select Artist Keywords to see a list of all the artist keywords in the entire database. Here you can edit the keywords and it will have a mass change effect on your data. Let’s use Beatles as an example. BEATLES is different from THE BEATLES which is different from BEATLES, THE. Make them all consistent to maximize effect of the artist keyword rules. We’ll discuss this in more detail in a future article, as well as dive into the Keyword Separation Wizard.
In conclusion, Artist Keywords are essential to accurate scheduling in MusicMaster. Taking the time to set them up properly and consistently will enable artist separation to be much more effective and will make log editing more efficient.
The question has come up, “How do I best use Artist Keywords?” Today we answer that question.
In most databases there are two artist fields: one is for the artist’s name as you’d like it to appear in your logs and reports (Artist), the other is used to test for artist separation (Artist Keywords). In many cases the Artist and the Artist Keyword fields will contain the same information: Aerosmith, Brooks and Dunn, Pink, etc. But in other situations the data in each will vary.
Many artists feature other “guest stars” on their songs. Let’s look at “Telephone” by Lady Gaga f/Beyonce. Your Artist Keywords on that song would be:
1) Lady Gaga
2) Beyonce
3) Destiny’s Child
To enter multiple keywords on a song, double-click in the Artist Keywords field in Library Maintenance (song card or grid view) to access the Keyword Entry box and enter the primary keyword in the first field, followed by the others and click Apply/OK. Your entry box will look like this:
Now any time “Telephone” is scheduled, it will follow the Artist Keyword rules for each keyword assigned to that song.
Let’s use another example of “We Are the World” which featured more than 20 soloists. If we wanted to, we could list each one as a unique Artist Keyword on that song, and MusicMaster would test the rules for every keyword assigned. In the picture below you’ll notice that only the first (primary) keyword displays in the Artist Keywords field, but that when we hover on that field with “Show Balloon Tips” enabled, we see all the keywords assigned…

You’ll also notice that we listed them all with their last names first. This is done for consistency and for sorting purposes. Ultimately it doesn’t matter how you enter the keywords so long as it is consistent. In other words…RICHIE, LIONEL and LIONEL RICHIE are two different keywords as far as MusicMaster is concerned.
Now let’s take this one step further. Let’s assume we are programming an oldies station that plays 60s and 70s music, so we’re going to play songs by the Beatles and by each of the members of the band. So how do we set up Artist Keywords in this situation? This depends on your programming philosophy. If you want to make sure that songs by the group are separated from songs by the soloists, but the soloists needn’t be separated from one another, you would use the Artist Keywords like this…
“Hey Jude” by The Beatles
“Imagine” by John Lennon
Because Lennon’s keyword is listed on the group song as well as the solo song, it will prevent them from playing too close to one another, based on your time separation rules for these keywords. And since the other keywords for McCartney, Harrison, and Starr are absent from “Imagine”, songs by those individuals will not be in violation of any artist keyword separation rules.
If you want to keep the soloists’ songs separated from one another and from songs by the group, your Artist Keyword entry would be the same for “Hey Jude”, but you would add Beatles as a second keyword on “Imagine”…
“Imagine” by John Lennon
You would also list Beatles as a second keyword on any solo songs by Paul, George, and Ringo. As a result, all the songs by the Beatles or by any of its members will be separated from one another based on the rules for those keywords. You can apply this same methodology to any group/soloist scenario: The Eagles, Van Halen, The Jackson Five, and so on.
One step further
In some formats where artists frequently make guest appearances on songs by others, it is sometimes beneficial to have two Artist Keyword fields. The first one would be for your primary artist keyword and the second for any guest performers. Take for example a song by Eminem that features Dr. Dre. Let’s assume Dr. Dre’s part on this song is pretty minimal, and he is making similar appearances on songs by Akon and by Lil Kim and let’s assume all three of these songs are in Heavy Currents…none of them will ever get aired because of Dr. Dre’s artist separation time. If we had a “Guest Keywords” field, Dr. Dre could be listed there instead of as a second Artist Keyword in that field. Your rules could be set that an Artist Keyword has to be separated from itself by 50 minutes, but a Guest Keyword only needs 10 minutes of separation. Now those three songs would be able to play because Dr. Dre’s keyword wouldn’t be holding them back.
Another step further
Want to clean up your Keywords? Go to Dataset/Library/Keywords and use the drop-down to select Artist Keywords to see a list of all the artist keywords in the entire database. Here you can edit the keywords and it will have a mass change effect on your data. Let’s use Beatles as an example. BEATLES is different from THE BEATLES which is different from BEATLES, THE. Make them all consistent to maximize effect of the artist keyword rules. We’ll discuss this in more detail in a future article, as well as dive into the Keyword Separation Wizard.
In conclusion, Artist Keywords are essential to accurate scheduling in MusicMaster. Taking the time to set them up properly and consistently will enable artist separation to be much more effective and will make log editing more efficient.
Monday, January 17, 2011
Queries
by Paul Ziino
A query in MusicMaster is the equivalency of a library search. You can save queries in the database that can be used in the library as well as in the schedule editor. Today we discuss a few of the options available to you in queries.
Saved Queries
First off, let’s talk about creating a query in general. For starters, go to Dataset/Library/Query the Library/New Query. This opens the Library Query box. Here you can select which categories to include in the query, as well as your search filters and sort keys. Let’s assume we are looking for all songs with Gender F (Female), and we only want to look in our music categories, and we’d like the list sorted alphabetically by Title. Check only the Music categories. Under Search Filters, use the pull-down to select the Gender field, then the operator is “Contains Any of”, select the desired code, and click Add. Under Sort Keys, in the first box use the pull-down to select the Title field. Your Library Query box will look like this…
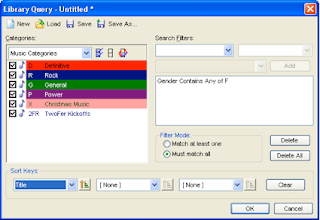
If we just click OK, MusicMaster will instantly pull a library search of just those items you’ve requested. But if we want to be able to run this exact query in the future, we would want to save it. To do so, click the “Save As” button, enter a New Query Name, and click “Save”.

Now you can automatically open this query in MusicMaster by going to Dataset/Library/Query the Library/Saved Query, select the desired query from the list and click Load. The query will search the selected categories each time it is run—so as your library changes, the results of your query will change, too.
When in the Schedule Editor, you can right-click on a position then select Schedule Song/Search using a Saved Query, and then select the desired query. The results of that saved query will populate your Replacement Window, and you’ll be able to select a song from the list.
Prompted Queries
Like a Saved Query, you can use a prompted query to search the library based on a set of criteria. The key here is that we can tell the query to allow you to select the parameters when you launch it. Here’s how…
To create the query, go to Dataset/Library/Query the Library/New Query. Again, let’s assume we want to include only music categories. Under Sort Keys, use the pull-down to select the Run Time field. Under Search Filters select the Run Time field, with an operator of “Greater than or equal to” and in the last box we’ll enter “@PROMPT(Run Low)”. Then click Add. Your query box will look like this…

Then add another Search filter for Runtime “Less than or equal to” and “@PROMPT(Run High)”. Add that filter, and now click Save As and label it as Runtime High/Low or something similar and Save it.
Now when you launch the Runtime High/Low query, your Query Prompts box will appear, and it will look like this…

Enter your lowest desired runtime in the Run Low field, and your highest in the Run High field, click Continue and your list of songs will be all those that fall within the desired range. For this sample, we did Run Low=3:10 and Run High=3:20. The results…

When you save prompted queries they are included with the other Saved Queries in the database, and are available in all the same places.
How and Where to Access Saved Queries
There are several ways to access your saved queries. Here is a list of them…
1. Click on Dataset/Library/Query the Library/Saved Query
2. In the Info Bar (View/Info Bar), on the music tab, Queries is one of the available panels.
3. When Library Maintenance is already open, click the New Query icon (binoculars, first icon on left) and click Load, then choose the desired saved query.
4. Also when Library Maintenance is already open, click the drop-down arrow to the right of the Favorite Query icon (third icon from left) and select your favorite.
5. In Schedule Editor, right-click on a position and select Schedule Song/Search Using a Saved Query, then choose the desired query.
Using Saved Queries can speed up your editing process and save you a lot of steps in the future.
A query in MusicMaster is the equivalency of a library search. You can save queries in the database that can be used in the library as well as in the schedule editor. Today we discuss a few of the options available to you in queries.
Saved Queries
First off, let’s talk about creating a query in general. For starters, go to Dataset/Library/Query the Library/New Query. This opens the Library Query box. Here you can select which categories to include in the query, as well as your search filters and sort keys. Let’s assume we are looking for all songs with Gender F (Female), and we only want to look in our music categories, and we’d like the list sorted alphabetically by Title. Check only the Music categories. Under Search Filters, use the pull-down to select the Gender field, then the operator is “Contains Any of”, select the desired code, and click Add. Under Sort Keys, in the first box use the pull-down to select the Title field. Your Library Query box will look like this…

If we just click OK, MusicMaster will instantly pull a library search of just those items you’ve requested. But if we want to be able to run this exact query in the future, we would want to save it. To do so, click the “Save As” button, enter a New Query Name, and click “Save”.

Now you can automatically open this query in MusicMaster by going to Dataset/Library/Query the Library/Saved Query, select the desired query from the list and click Load. The query will search the selected categories each time it is run—so as your library changes, the results of your query will change, too.
When in the Schedule Editor, you can right-click on a position then select Schedule Song/Search using a Saved Query, and then select the desired query. The results of that saved query will populate your Replacement Window, and you’ll be able to select a song from the list.
Prompted Queries
Like a Saved Query, you can use a prompted query to search the library based on a set of criteria. The key here is that we can tell the query to allow you to select the parameters when you launch it. Here’s how…
To create the query, go to Dataset/Library/Query the Library/New Query. Again, let’s assume we want to include only music categories. Under Sort Keys, use the pull-down to select the Run Time field. Under Search Filters select the Run Time field, with an operator of “Greater than or equal to” and in the last box we’ll enter “@PROMPT(Run Low)”. Then click Add. Your query box will look like this…

Then add another Search filter for Runtime “Less than or equal to” and “@PROMPT(Run High)”. Add that filter, and now click Save As and label it as Runtime High/Low or something similar and Save it.
Now when you launch the Runtime High/Low query, your Query Prompts box will appear, and it will look like this…
Enter your lowest desired runtime in the Run Low field, and your highest in the Run High field, click Continue and your list of songs will be all those that fall within the desired range. For this sample, we did Run Low=3:10 and Run High=3:20. The results…

When you save prompted queries they are included with the other Saved Queries in the database, and are available in all the same places.
How and Where to Access Saved Queries
There are several ways to access your saved queries. Here is a list of them…
1. Click on Dataset/Library/Query the Library/Saved Query
2. In the Info Bar (View/Info Bar), on the music tab, Queries is one of the available panels.
3. When Library Maintenance is already open, click the New Query icon (binoculars, first icon on left) and click Load, then choose the desired saved query.
4. Also when Library Maintenance is already open, click the drop-down arrow to the right of the Favorite Query icon (third icon from left) and select your favorite.
5. In Schedule Editor, right-click on a position and select Schedule Song/Search Using a Saved Query, then choose the desired query.
Using Saved Queries can speed up your editing process and save you a lot of steps in the future.
Friday, December 17, 2010
I'm Often Asked . . .
by Aaron Taylor
After working with clients for a number of years here at A-Ware Software as a Music Scheduling Consultant, I’ve been able to identify a handful of questions it seems I am asked on a regular basis. Some of these you may already know the answer to. Hopefully, there at least a couple here that you’ve always “meant to ask” or perhaps maybe “thought I was supposed to know that already”.
So here (in no particular order) are the top five questions I am asked about MusicMaster.
Can I run MMWIN on my Mac? YES!
In recent years, the availability of a Pentium chipset has made running MusicMaster for Windows on a Mac a reality. While you are not able to run the application natively on your Mac (on the operating system) there are several options.
First, you might want to explore running MusicMaster in “virtualization” mode.
Virtualization is the hosting of individual applications in an environment separated from the underlying OS. The two major virtualization programs that we are aware of are:
Parallels http://www.parallels.com and VM Fusion http://www.vmware.com/products/fusion.
When you purchase and install these programs, you are able to create a virtual environment to run your Windows programs under. There may be some keyboard and mouse tricks you need to learn to allow you to maximize your use of the program by this method, but we have many users doing this now as their sole method of utilizing MusicMaster.
The other route you may opt for is to create a partition on your Mac to run a Windows environment, in addition to a Mac OS. Apple has software called BootCamp:
http://www.apple.com/support/bootcamp
This allows you to select from your Windows or Mac OS when you boot up your Mac. In that way, MusicMaster will operate the same way it always has on your Windows XP, Vista, or 7 machine. A caveat to this is that you also need to have in your possession a full installation version of the Windows operating system you intend to run on the partition, as this will need to be installed by the user as part of the set up.
Can I play audio from my automation system (or my iTunes) from MusicMaster? YES!
This involves setting up or pointing to a field in your MusicMaster database that matches the filenames for the audio on your automation system or other play out software. Then, you’ll go to TOOLS-OPTIONS-AUDIO FILE OPTIONS and configure the set up.

There is also a helpful utility found under Library-Audio-Verify in Library Maintenance that will allow you to check to make sure the pathing you’ve set up is correct and that the audio files can be found for each entry in the library you might wish to play.

In general, the F12 key plays the audio in MusicMaster (CTRL-F12 to stop it).
We’ve created a Webinar to walk users through this process a while back that goes into more depth on this topic. You can view it any time via the MusicMaster website (http://www.mmwin.com) here is the direct link: http://www.mmwin.com/company/webinar/webinar20090415.wmv
Also, your MusicMaster Scheduling Consultant is happy to assist you in the configuration process of this functionality as well.
I want to access the MusicMaster support site, and need to get a username/password or have forgotten my username/password, can you help me? YES!
The MusicMaster website is http://www.mmwin.com. When you access the site, you should see Support listed on the left side of the screen. There are two areas in support, Tech Support and Customer Login. Tech Support has a link to access the Client Support Center, as well as the link for our internet-based training. Customer Login is where you will find downloads of the latest versions of the software, training videos, past Newsletters and more. When you open this screen, you will see the Login in window.

If you have not already done so, you must create your Account. There is an option at the bottom of the screen to Create Account. The information requested in the Create New Account window is basic. You will be asked to pick your own user name and password. Both of these fields are case sensitive. Once the registration has been approved, you will received an e-mail from support@mmwin.com indicating your registration has been approved and that your user name and password have been activated.
We are unable to look up your username/password combinations for you once you have set them, but you are able to reset your password from this screen (if you remember the username you signed up for at least). A reset message/instructions are then sent to your email address. If you still have trouble, or do not get a reply from the automated system, contact your MSC or support@mmwin.com for further assistance.
Can I print a report or music log and send it to my consultant or off site voice tracker? YES!
The simplest way to do this is to add a PDF generator to your machine as a printer option. There are a variety of options out there (you may already have one installed on your machine)…One we like to suggest to users who do not already have one is PDF 995: http://www.pdf995.com
This creates a file that can be opened by the user on the other end with a free PDF reader utility.
http://get.adobe.com/reader.
Once you’ve installed this (and verified the user on the other end has a reader app installed), your PDF generator option will show as a printer choice when you are ready to PRINT your report or music log.

If selected, you’ll have the option of where to save the .PDF on your desktop, folder etc. Once it is created, simply open your email, locate the file on your computer and attach the it to your email!
I need to make a copy of my database for testing purposes, and/or I would like to create a new MusicMaster database from “scratch”. Can I do this? YES!
Just go to the Datafile Manager, FILE-OPEN DATASET.
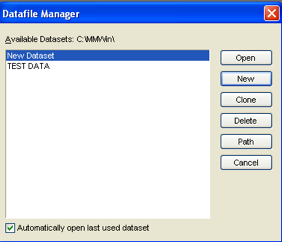
If you choose NEW, you will have the option to “Create a New Keep It Simple Database”. This gives you an empty, basic MusicMaster database ready to populate with you new song library, clocks, and rules.
If you choose CLONE, you will create an exact duplicate of the database that is currently highlighted in the Datafile Manager list. You should then rename the cloned database to something else to differentiate the two.
Hopefully after reading today’s article, I’ve been able to “knock off” at least a few things about MusicMaster you’ve always been curious about. As always, we are here to help with any question you have about the program, no matter how basic you think that question might be!
After working with clients for a number of years here at A-Ware Software as a Music Scheduling Consultant, I’ve been able to identify a handful of questions it seems I am asked on a regular basis. Some of these you may already know the answer to. Hopefully, there at least a couple here that you’ve always “meant to ask” or perhaps maybe “thought I was supposed to know that already”.
So here (in no particular order) are the top five questions I am asked about MusicMaster.
Can I run MMWIN on my Mac? YES!
In recent years, the availability of a Pentium chipset has made running MusicMaster for Windows on a Mac a reality. While you are not able to run the application natively on your Mac (on the operating system) there are several options.
First, you might want to explore running MusicMaster in “virtualization” mode.
Virtualization is the hosting of individual applications in an environment separated from the underlying OS. The two major virtualization programs that we are aware of are:
Parallels http://www.parallels.com and VM Fusion http://www.vmware.com/products/fusion.
When you purchase and install these programs, you are able to create a virtual environment to run your Windows programs under. There may be some keyboard and mouse tricks you need to learn to allow you to maximize your use of the program by this method, but we have many users doing this now as their sole method of utilizing MusicMaster.
The other route you may opt for is to create a partition on your Mac to run a Windows environment, in addition to a Mac OS. Apple has software called BootCamp:
http://www.apple.com/support/bootcamp
This allows you to select from your Windows or Mac OS when you boot up your Mac. In that way, MusicMaster will operate the same way it always has on your Windows XP, Vista, or 7 machine. A caveat to this is that you also need to have in your possession a full installation version of the Windows operating system you intend to run on the partition, as this will need to be installed by the user as part of the set up.
Can I play audio from my automation system (or my iTunes) from MusicMaster? YES!
This involves setting up or pointing to a field in your MusicMaster database that matches the filenames for the audio on your automation system or other play out software. Then, you’ll go to TOOLS-OPTIONS-AUDIO FILE OPTIONS and configure the set up.

There is also a helpful utility found under Library-Audio-Verify in Library Maintenance that will allow you to check to make sure the pathing you’ve set up is correct and that the audio files can be found for each entry in the library you might wish to play.
In general, the F12 key plays the audio in MusicMaster (CTRL-F12 to stop it).
We’ve created a Webinar to walk users through this process a while back that goes into more depth on this topic. You can view it any time via the MusicMaster website (http://www.mmwin.com) here is the direct link: http://www.mmwin.com/company/webinar/webinar20090415.wmv
Also, your MusicMaster Scheduling Consultant is happy to assist you in the configuration process of this functionality as well.
I want to access the MusicMaster support site, and need to get a username/password or have forgotten my username/password, can you help me? YES!
The MusicMaster website is http://www.mmwin.com. When you access the site, you should see Support listed on the left side of the screen. There are two areas in support, Tech Support and Customer Login. Tech Support has a link to access the Client Support Center, as well as the link for our internet-based training. Customer Login is where you will find downloads of the latest versions of the software, training videos, past Newsletters and more. When you open this screen, you will see the Login in window.

If you have not already done so, you must create your Account. There is an option at the bottom of the screen to Create Account. The information requested in the Create New Account window is basic. You will be asked to pick your own user name and password. Both of these fields are case sensitive. Once the registration has been approved, you will received an e-mail from support@mmwin.com indicating your registration has been approved and that your user name and password have been activated.
We are unable to look up your username/password combinations for you once you have set them, but you are able to reset your password from this screen (if you remember the username you signed up for at least). A reset message/instructions are then sent to your email address. If you still have trouble, or do not get a reply from the automated system, contact your MSC or support@mmwin.com for further assistance.
Can I print a report or music log and send it to my consultant or off site voice tracker? YES!
The simplest way to do this is to add a PDF generator to your machine as a printer option. There are a variety of options out there (you may already have one installed on your machine)…One we like to suggest to users who do not already have one is PDF 995: http://www.pdf995.com
This creates a file that can be opened by the user on the other end with a free PDF reader utility.
http://get.adobe.com/reader.
Once you’ve installed this (and verified the user on the other end has a reader app installed), your PDF generator option will show as a printer choice when you are ready to PRINT your report or music log.

If selected, you’ll have the option of where to save the .PDF on your desktop, folder etc. Once it is created, simply open your email, locate the file on your computer and attach the it to your email!
I need to make a copy of my database for testing purposes, and/or I would like to create a new MusicMaster database from “scratch”. Can I do this? YES!
Just go to the Datafile Manager, FILE-OPEN DATASET.
If you choose NEW, you will have the option to “Create a New Keep It Simple Database”. This gives you an empty, basic MusicMaster database ready to populate with you new song library, clocks, and rules.
If you choose CLONE, you will create an exact duplicate of the database that is currently highlighted in the Datafile Manager list. You should then rename the cloned database to something else to differentiate the two.
Hopefully after reading today’s article, I’ve been able to “knock off” at least a few things about MusicMaster you’ve always been curious about. As always, we are here to help with any question you have about the program, no matter how basic you think that question might be!
Wednesday, December 1, 2010
Overview of Packeting in MusicMaster
By Aaron Taylor
Packeting can be used to group songs together, which will have the effect of slowing down the rotation of the individual songs. A great example of the use of packeting might be to group the studio, acoustic, or live versions of a particular song together in a packet so they are not rotating independently. I also like to suggest to clients that they may want to consider packeting the “one hit wonders” or very tertiary songs in a category together in packets, so that you can potentially avoid music sets clustered with a seemingly stack of these marginal songs. It is also a common desire to packet non music elements together, like jingles, liners, or sweepers.
The packeting utility in MMWin will also allow you (if desired) to “weight” a packet, so that particular cuts in the packet will play X number of times before moving onto the next song in the packet order.
You can group any number of songs (as part of the same category) into as many packets as you wish.
To access the Packet editor in MusicMaster Windows, there are several routes. You may either right-click on a song and go to Packet; select Dataset, Library, Packets which will open the Packet Editor window; or if you add the Packet field to your Library Maintenance display, you can click that field for the song you wish to create or add to a packet.
Below is a view of the Packet Editor window.

PACKET EDITOR OVERVIEW -
On the left hand side you see a list of all the packets in the program, showing their name and category they are in. The drop-down box in the upper-left lets you choose which category you look at. This information is repeated in the Description and Category boxes in the center of the screen. By clicking on any packet name, the main center box will show you the songs in that packet. Other options/information available here include:
• Description – The name given to the packet. You may change it by clicking into this box.
• Category – Indicates what category the packet is contained in. If desired, you can use the drop-down box to move the packet to a different category.
• Keep Packet Together – With this box checked, if you move a song that is within a packet, all songs in the packet will be moved. If this is not checked off and a song is moved, that song will be removed from the packet and sent to the category specified. The remaining songs will still be in the packet. It is important to remember if you decide to set this for the future, as we’ll get calls from time to time from clients wondering why seemingly “groups” of songs moved, when only one was targeted for a move. You forgot the song was packeted, and the “keep packet together” setting was selected!
• Packet Type – There are three types of packets: standard, diggable and weighted. Here is an explanation of each type:
CREATE A NEW PACKET –
Select Create and confirm. Name the packet in the Description field, the select ADD. This will open the standard Database Query box where you will be able to pick categories, filter and sort the list to narrow down the songs you view. When the list comes up, you can choose as many songs as you’d like. To select more than one at a time, hold down the Control key. When you have selected all the songs, click on Add. This will bring the titles into the packet creation window. When you click Close, the packeting process will complete.
Other options at the top of the screen include Delete, AutoPacket and Unpacket. While Delete and Unpacket are fairly self explanatory, the AutoPacket feature deserves a bit of explanation. This utility allows for you to select criteria that will be utilized to create a packet. You will pick the categories you want to include, the minimum number of songs there must be for the creation of a packet, the maximum number of songs in a packet, and the packet name. The standard Song Filter box is used to create the filter.
A FEW OTHER NOTES ABOUT PACKETS AND PACKETING -
As mentioned above, you can add the Packet field to you Library Maintenance view. This will allow you to see the name of the packet and any day part restrictions. If you move the cursor over the Packet field with your mouse, it will tell you the number of songs in the packet and the number of restricted hours for day parts.
To see a combined history graph showing all plays of the songs in a packet, use the drop-down arrow and select Packet. If you have the packet field showing, you can click [SHIFT F6] in the field do to this as well.

Packeting will slow down the rotation of individual songs in a category. This is reflected in Analysis-Turnover.
When using a standard packet and sorting a song list by rest, the packet history will be used to calculate the rest time for each song. The rest time will be the same for all songs in the packet.
In the Schedule Editor, this means the way the list is displayed in the replacement window may show some individual song rest times that are higher than the songs around it. Make sure to pay special attention to whether packets are in use for the category you are viewing. You should be able to spot the song from the packet that is being used to calculate the rest.
If you have any questions about how to best utilize this functionality in MusicMaster for your particular situation, please don’t hesitate to get in contact with your Music Scheduling Consultant!
Packeting can be used to group songs together, which will have the effect of slowing down the rotation of the individual songs. A great example of the use of packeting might be to group the studio, acoustic, or live versions of a particular song together in a packet so they are not rotating independently. I also like to suggest to clients that they may want to consider packeting the “one hit wonders” or very tertiary songs in a category together in packets, so that you can potentially avoid music sets clustered with a seemingly stack of these marginal songs. It is also a common desire to packet non music elements together, like jingles, liners, or sweepers.
The packeting utility in MMWin will also allow you (if desired) to “weight” a packet, so that particular cuts in the packet will play X number of times before moving onto the next song in the packet order.
You can group any number of songs (as part of the same category) into as many packets as you wish.
To access the Packet editor in MusicMaster Windows, there are several routes. You may either right-click on a song and go to Packet; select Dataset, Library, Packets which will open the Packet Editor window; or if you add the Packet field to your Library Maintenance display, you can click that field for the song you wish to create or add to a packet.
Below is a view of the Packet Editor window.

PACKET EDITOR OVERVIEW -
On the left hand side you see a list of all the packets in the program, showing their name and category they are in. The drop-down box in the upper-left lets you choose which category you look at. This information is repeated in the Description and Category boxes in the center of the screen. By clicking on any packet name, the main center box will show you the songs in that packet. Other options/information available here include:
• Description – The name given to the packet. You may change it by clicking into this box.
• Category – Indicates what category the packet is contained in. If desired, you can use the drop-down box to move the packet to a different category.
• Keep Packet Together – With this box checked, if you move a song that is within a packet, all songs in the packet will be moved. If this is not checked off and a song is moved, that song will be removed from the packet and sent to the category specified. The remaining songs will still be in the packet. It is important to remember if you decide to set this for the future, as we’ll get calls from time to time from clients wondering why seemingly “groups” of songs moved, when only one was targeted for a move. You forgot the song was packeted, and the “keep packet together” setting was selected!
• Packet Type – There are three types of packets: standard, diggable and weighted. Here is an explanation of each type:
- A standard packet keeps track of the next song that should be considered. When the packet comes up, that song is tested. No other songs in the packet will be tested.
- When a diggable packet comes up for consideration, songs in the packet will be tested up to the search depth that has been set to see if the song passes the tests on the category.
- A weighted packet allows you to determine how many times a song in a packet plays before moving to the next song in the packet. As an example, if you have a two-song packet and you want one of the songs to play twice as much as the other, you would want to place a two in the Weight column that will be displayed when you choose this option.
CREATE A NEW PACKET –
Select Create and confirm. Name the packet in the Description field, the select ADD. This will open the standard Database Query box where you will be able to pick categories, filter and sort the list to narrow down the songs you view. When the list comes up, you can choose as many songs as you’d like. To select more than one at a time, hold down the Control key. When you have selected all the songs, click on Add. This will bring the titles into the packet creation window. When you click Close, the packeting process will complete.
Other options at the top of the screen include Delete, AutoPacket and Unpacket. While Delete and Unpacket are fairly self explanatory, the AutoPacket feature deserves a bit of explanation. This utility allows for you to select criteria that will be utilized to create a packet. You will pick the categories you want to include, the minimum number of songs there must be for the creation of a packet, the maximum number of songs in a packet, and the packet name. The standard Song Filter box is used to create the filter.
A FEW OTHER NOTES ABOUT PACKETS AND PACKETING -
As mentioned above, you can add the Packet field to you Library Maintenance view. This will allow you to see the name of the packet and any day part restrictions. If you move the cursor over the Packet field with your mouse, it will tell you the number of songs in the packet and the number of restricted hours for day parts.
To see a combined history graph showing all plays of the songs in a packet, use the drop-down arrow and select Packet. If you have the packet field showing, you can click [SHIFT F6] in the field do to this as well.

Packeting will slow down the rotation of individual songs in a category. This is reflected in Analysis-Turnover.
When using a standard packet and sorting a song list by rest, the packet history will be used to calculate the rest time for each song. The rest time will be the same for all songs in the packet.
In the Schedule Editor, this means the way the list is displayed in the replacement window may show some individual song rest times that are higher than the songs around it. Make sure to pay special attention to whether packets are in use for the category you are viewing. You should be able to spot the song from the packet that is being used to calculate the rest.
If you have any questions about how to best utilize this functionality in MusicMaster for your particular situation, please don’t hesitate to get in contact with your Music Scheduling Consultant!
Monday, November 22, 2010
Using the MusicMaster CD Ripper
By Marianne Burkett
Depending on your “normal” habits of adding music to your MusicMaster library, you may not be aware of a convenient feature that is available: the CD Ripper .
Go to Tools/Import CD Audio
You’ll see this:

Toss a CD you’d like to import into your CD drive of your computer and allow it to process.
You will see then if any data is available on the CD:

In this case, the CD Data contained the Title of the Disc, year of release, Artist, Titles and Runtimes. MusicMaster uses the FreeDB database to populate this information.
Next step is setup. Click on Setup: There you’ll have the option to rip to WAV, MP3 and in the case of the example below… I’m ripping Metadata only because I don’t want to actually import the music at this time.
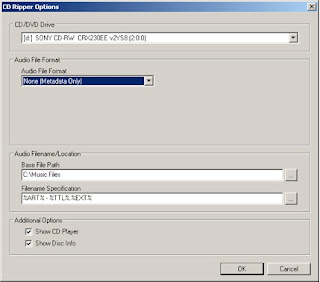
Had I selected mp3 in the Audio File Format selection drag down…it would actually rip the audio into my Base File Path with Artist – Title.mp3.
Then I will select Rip Tracks!

Now I’ll see this screen:

What you see on the screen is the available Metadata on the CD.
Be sure at this time to match the Target Field to the Source. “Target” is which field in MusicMaster the data will be directed to and “Source” is what information is available on the CD…which you see on the screen. After you’re done setting up the fields, simply click on “Import”
Now all the titles I just ripped will go directly into “Uncategorized Songs”
I’ll get this message before I close out:

I go to Uncategorized songs and there are my songs! All I need to do now is put them in normal categories, code them and be sure to enter my artist keywords and I’m done!

Depending on your “normal” habits of adding music to your MusicMaster library, you may not be aware of a convenient feature that is available: the CD Ripper .
Go to Tools/Import CD Audio
You’ll see this:

Toss a CD you’d like to import into your CD drive of your computer and allow it to process.
You will see then if any data is available on the CD:

In this case, the CD Data contained the Title of the Disc, year of release, Artist, Titles and Runtimes. MusicMaster uses the FreeDB database to populate this information.
Next step is setup. Click on Setup: There you’ll have the option to rip to WAV, MP3 and in the case of the example below… I’m ripping Metadata only because I don’t want to actually import the music at this time.

Had I selected mp3 in the Audio File Format selection drag down…it would actually rip the audio into my Base File Path with Artist – Title.mp3.
Then I will select Rip Tracks!
Now I’ll see this screen:

What you see on the screen is the available Metadata on the CD.
Be sure at this time to match the Target Field to the Source. “Target” is which field in MusicMaster the data will be directed to and “Source” is what information is available on the CD…which you see on the screen. After you’re done setting up the fields, simply click on “Import”
Now all the titles I just ripped will go directly into “Uncategorized Songs”
I’ll get this message before I close out:
I go to Uncategorized songs and there are my songs! All I need to do now is put them in normal categories, code them and be sure to enter my artist keywords and I’m done!

Wednesday, November 10, 2010
Ho Ho Ho! Get ready for Christmas!
By Marianne Burkett
The holidays are approaching fast, so here’s a summary of the things you need to be thinking about as you get ready to add Christmas music to your rotations.
MusicMaster Checklist:
1. Be sure you’ve got your Christmas categories filled up.
2. Complete Coding! Sound Codes, like Contemporary, Religious, Novelty and Traditional are common. If you want to keep certain types of Christmas titles apart – code them! Create new Sound Codes in Dataset/Library/Attributes. Don’t forget about your Gender and Tempo Codes as well.
3. Likely, your normal rules will not fit your Christmas categories. Be sure you isolate coding rules for the Christmas music. You can either put the holiday coding rules directly in the Christmas categories or use Category specific “Rule Groups” in the “All Categories” area of the rule tree. Set your Normal Rule Group properties to only pay attention to your Normal categories and a Christmas Rule Group for your Christmas categories.
4. Don’t forget to double-check your Title Keywords for accuracy. You can keep like titles apart using either Title Keyword time separation rules and apply them to your Christmas Categories or Optimum Keyword Rest with your Optimum Scheduling Goals rules.
5. Run a Library Analysis in the Title field on the total number of Christmas titles. How many Silent Nights and White Christmas titles are you playing? How far apart can you keep them?

6. Christmas clocks and assignment grids. Some stations go “all Christmas” in November and some others like to “gradually” increase the number of Christmas titles from week to week until Christmas day. Regardless of how you program your Christmas music, create clocks and assignment grids that will fit your programming goals.
7. Use the Format Scheduler! Have you tried out the Format Scheduler? Dataset/Clocks – look to the lower left and click on Format Scheduler. Right click on any day in the calendar and schedule the appropriate grid for the day or week! MusicMaster will automatically switch from grid to grid, so you don’t have to set them manually.

8. Be sure to check your Schedule Properties to check on your pass order and search depth of your Christmas categories. Dataset/Schedule/Schedule Properties.
9. Check your Schedule Order and clear your Skip and Fail counter on your Christmas Categories. Dataset/Schedule/Schedule Order.
10. When Auto Scheduling, make sure your Christmas Categories are checked. Unless you “Step Schedule”, a good rule of thumb is to just have all your Categories checked during an auto scheduling sesssion. If it’s not in the clocks – it won’t schedule.
11. By all means, if you need any help with setting up your Christmas programming – feel free to contact your dedicated Music Scheduling Consultant.
The holidays are approaching fast, so here’s a summary of the things you need to be thinking about as you get ready to add Christmas music to your rotations.
MusicMaster Checklist:
1. Be sure you’ve got your Christmas categories filled up.
2. Complete Coding! Sound Codes, like Contemporary, Religious, Novelty and Traditional are common. If you want to keep certain types of Christmas titles apart – code them! Create new Sound Codes in Dataset/Library/Attributes. Don’t forget about your Gender and Tempo Codes as well.
3. Likely, your normal rules will not fit your Christmas categories. Be sure you isolate coding rules for the Christmas music. You can either put the holiday coding rules directly in the Christmas categories or use Category specific “Rule Groups” in the “All Categories” area of the rule tree. Set your Normal Rule Group properties to only pay attention to your Normal categories and a Christmas Rule Group for your Christmas categories.
4. Don’t forget to double-check your Title Keywords for accuracy. You can keep like titles apart using either Title Keyword time separation rules and apply them to your Christmas Categories or Optimum Keyword Rest with your Optimum Scheduling Goals rules.
5. Run a Library Analysis in the Title field on the total number of Christmas titles. How many Silent Nights and White Christmas titles are you playing? How far apart can you keep them?

6. Christmas clocks and assignment grids. Some stations go “all Christmas” in November and some others like to “gradually” increase the number of Christmas titles from week to week until Christmas day. Regardless of how you program your Christmas music, create clocks and assignment grids that will fit your programming goals.
7. Use the Format Scheduler! Have you tried out the Format Scheduler? Dataset/Clocks – look to the lower left and click on Format Scheduler. Right click on any day in the calendar and schedule the appropriate grid for the day or week! MusicMaster will automatically switch from grid to grid, so you don’t have to set them manually.

8. Be sure to check your Schedule Properties to check on your pass order and search depth of your Christmas categories. Dataset/Schedule/Schedule Properties.
9. Check your Schedule Order and clear your Skip and Fail counter on your Christmas Categories. Dataset/Schedule/Schedule Order.
10. When Auto Scheduling, make sure your Christmas Categories are checked. Unless you “Step Schedule”, a good rule of thumb is to just have all your Categories checked during an auto scheduling sesssion. If it’s not in the clocks – it won’t schedule.
11. By all means, if you need any help with setting up your Christmas programming – feel free to contact your dedicated Music Scheduling Consultant.
Subscribe to:
Posts (Atom)


 Posts
Posts


